Cómo configurar un Apple ID para la región de Turquía o Kazajistán: guía paso a paso 2026
Guía paso a paso 2026: cómo crear o cambiar tu Apple ID a la región de Turquía o Kazajistán, configurar VPN, añadir métodos de pago, gestionar riesgos y verificar resultados. Ideal para principiantes, con consejos para usuarios avanzados. Duración estimada: 45–90 minutos.
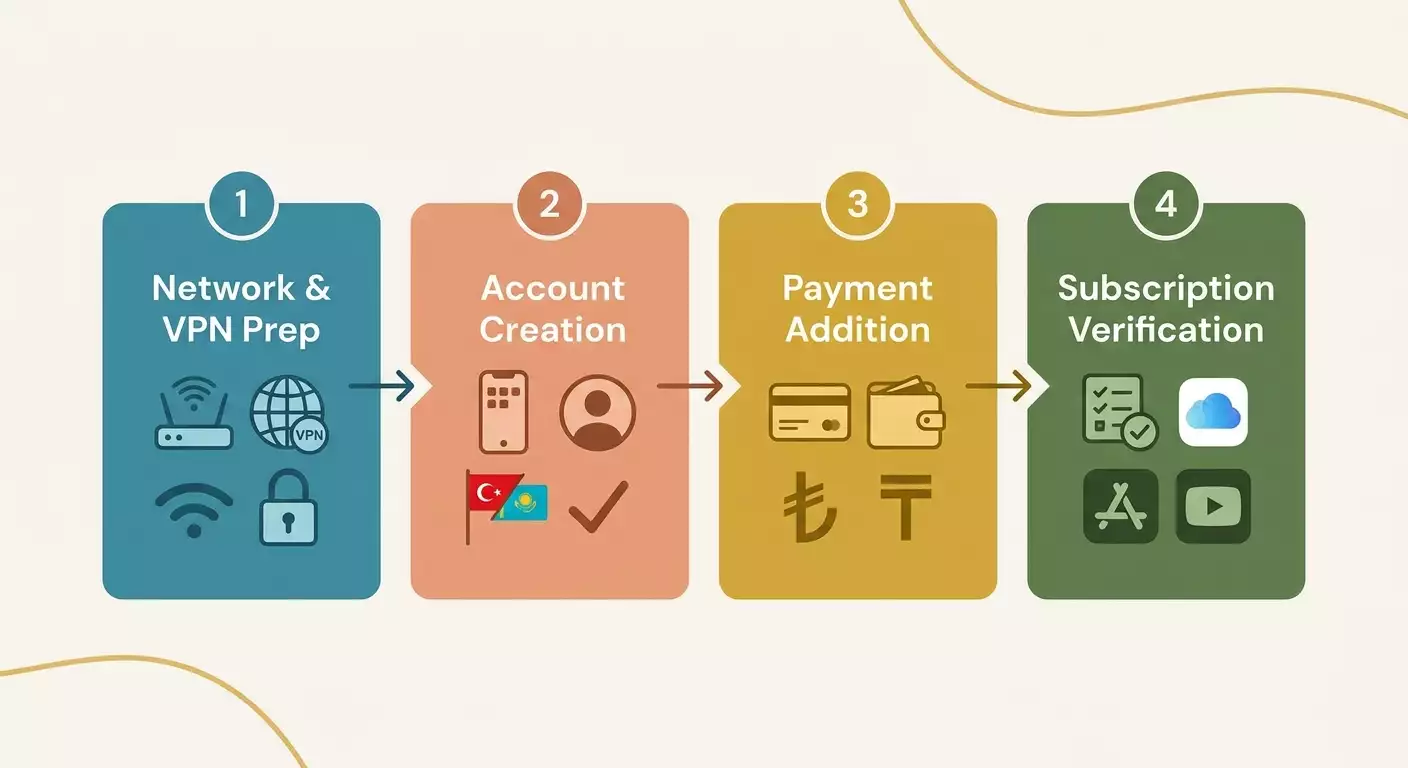
Contenido del artículo
- Introducción
- Preparación previa
- Conceptos básicos
- Paso 1: elegir estrategia de cuenta
- Paso 2: configurar vpn y red
- Paso 3: crear apple id para turquía o kazajistán
- Paso 4: configurar seguridad y verificaciones
- Paso 5: añadir métodos de pago para tr/kz
- Paso 6: dirección y facturación correcta
- Paso 7: iniciar sesión en dispositivos y configuración inicial
- Paso 8: primeras compras y suscripciones
- Chequeo final
- Errores comunes y soluciones
- Opciones adicionales
- Preguntas frecuentes
- Conclusión
Introducción
En esta guía práctica te enseñaremos paso a paso cómo configurar tu Apple ID para la región de Turquía o Kazajistán, añadir métodos de pago y hacer tus primeras compras y suscripciones de forma segura. Explicaremos con detalle cómo preparar tu red y VPN, qué métodos de pago funcionan realmente en 2026, además de los riesgos existentes y cómo minimizarlos. El resultado final será un Apple ID funcional en la región de Turquía o Kazajistán, que te permitirá descargar apps y pagar suscripciones con métodos accesibles.
Esta guía es ideal para usuarios que se enfrentan por primera vez al tema del Apple ID regional, así como para quienes quieran profundizar en configuraciones avanzadas de seguridad, entorno de red y facturación. Explicamos cada paso con un lenguaje sencillo, sin jerga innecesaria, y te indicamos exactamente dónde clicar y qué datos ingresar.
Antes de empezar, es importante entender que cambiar de región o crear una cuenta en otro país puede contravenir las condiciones de uso de Apple. Usa estas instrucciones con responsabilidad, solo con métodos legales de pago y datos verídicos. Aquí no promovemos infringir la ley ni engañar servicios, sólo mostramos aspectos técnicos, riesgos y formas de hacerlo correctamente.
Completar todos los pasos puede tomar de 45 a 90 minutos, dependiendo del escenario elegido, las herramientas disponibles y la rapidez de respuesta de los servicios al verificar identidad y pagos. Si preparas con antelación red, direcciones, códigos de confirmación y métodos de pago, puedes reducir el tiempo a 30–45 minutos.
Consejo: Ten a mano una libreta o notas en tu dispositivo. Apunta direcciones, códigos postales, respuestas a preguntas de seguridad, códigos únicos de respaldo y los textos exactos que completes. Esto ayudará a evitar errores y facilitará repetir los pasos en el futuro.
Preparación previa
Para que el proceso sea fluido, prepara tus herramientas y condiciones con tiempo. En esta sección aprenderás qué instalar, qué datos recopilar y cómo crear copias de seguridad para restaurar si es necesario.
Herramientas y accesos necesarios
- iPhone o iPad con la última versión de iOS o iPadOS, o Mac con macOS actualizado. Las interfaces son similares y las diferencias mínimas.
- Acceso a internet estable con velocidad mínima de 5–10 Mbps.
- Número de teléfono móvil funcional para recibir códigos SMS, preferiblemente uno con acceso prolongado.
- Correo electrónico controlado por ti, con dirección única no vinculada a tu Apple ID actual.
- VPN o servidor dedicado para acceder a la región deseada, para que Apple vea una ubicación coherente con la región del Apple ID. Esto reduce la posibilidad de verificaciones adicionales.
- Método de pago válido para la región seleccionada: tarjeta local, tarjetas regalo para saldo de Apple ID, acceso familiar con organizador en la misma región o cualquier método legal disponible en 2026.
Requisitos del sistema
- Versión actual de iOS o iPadOS en tu dispositivo. Actualízate en Ajustes → General → Actualización de software.
- En Mac, macOS actualizada y App Store actualizada.
- Espacio libre suficiente para descargar apps y caché (al menos 2–5 GB).
Qué descargar e instalar con anticipación
- Cliente VPN del protocolo elegido (por ejemplo, IKEv2, WireGuard, OpenVPN). Depende del proveedor.
- App autenticadora o estar listo para recibir códigos por SMS para la autenticación de dos factores.
Copia de seguridad
Si vas a cambiar la región en un Apple ID existente, crea una copia de seguridad del iPhone o iPad usando iCloud o Finder. Si crearás un Apple ID nuevo para otra región, no es obligatorio pero recomendable para tu tranquilidad.
⚠️ Atención: Algunas suscripciones y servicios pueden no estar disponibles tras cambiar región, y el saldo podría perderse o necesitar gastarse antes. Lee las condiciones de Apple y asegúrate de entender las consecuencias para tus suscripciones y compras actuales.
✅ Verificación: En este punto cuentas con conexión a internet, cliente VPN instalado, correo y teléfono disponibles, y copia de seguridad si aplica.
Conceptos básicos
Antes de comenzar, aclararemos términos clave de forma sencilla para que entiendas por qué hacemos cada paso y qué parámetros son importantes.
- Apple ID: cuenta con la que entras a App Store, iCloud, Apple Music y otros servicios.
- Región del Apple ID: país o región asociada a la tienda y sistema de pagos. Influyen precios, moneda, disponibilidad de contenido y métodos de pago.
- Autenticación de dos factores (2FA): nivel extra de seguridad, confirmando acceso con código desde SMS, app o teléfono.
- VPN: conexión segura que puede cambiar tu IP visible y ruta del tráfico, afectando la verificación geográfica de Apple.
- Dirección de facturación: dirección vinculada a tu método de pago y que debe coincidir con la región del Apple ID.
- Saldo Apple ID: cuenta recargable con tarjetas regalo que sirve para compras y suscripciones, si se admite en la región.
Apple puede analizar múltiples señales: IP, región de SIM, método de pago, dirección, idioma y histórico de accesos. Nuestro objetivo es que todo parezca coherente y lógico al usar la región elegida, sin engañar a Apple ni infringir reglas.
Consejo: Si tienes vínculo real con la región (viaje largo, lugar de trabajo, familiares, negocios), úsalo para legitimar la configuración. Esto reduce verificaciones y mejora estabilidad de la cuenta.
Paso 1: Elegir estrategia de cuenta
Objetivo: Decidir si crear un Apple ID nuevo para Turquía o Kazajistán, o cambiar la región en una cuenta existente, y elegir el método de pago.
Opción A: Crear nuevo Apple ID para región TR o KZ
Esta opción es más segura para tus compras y suscripciones actuales, porque no afecta tu cuenta principal. Podrás usar simultáneamente dos Apple ID: uno para iCloud y otro regional para App Store. En iPhone y iPad esta separación funciona bien: iCloud con una cuenta y App Store con otra.
Opción B: Cambiar región del Apple ID existente
Adecuado si te mudas definitivamente o quieres migrar todo tu ecosistema. Es un proceso más complicado y arriesgado: necesitarás cancelar suscripciones activas, gastar saldo restante, y parte del contenido podría desaparecer en la nueva región.
Selección del método de pago
- Tarjeta bancaria local de la región: tarjeta emitida en Turquía o Kazajistán, asociada a dirección local. Generalmente la mejor opción.
- Saldo de Apple ID con tarjetas regalo: recargas saldo y pagas desde ahí. Funciona para la mayoría de suscripciones si el servicio no exige tarjeta física.
- Acceso familiar: si el organizador vive en la región y tiene tarjeta válida, puedes usar su método para suscripciones compartidas.
- Pago móvil: disponible solo en algunos países y operadores locales. Útil si tienes SIM o eSIM regional.
⚠️ Atención: No uses tarjetas ni direcciones prestadas o dudosas. Intentos de fraude pueden bloquear tu Apple ID y el acceso a compras. Siempre ingresa información veraz y legítima.
- Define si crearás cuenta nueva o cambiarás región.
- Elige método de pago legal y disponible para ti.
- Prepara dirección y código postal válidos para la región y método de pago.
- Decide qué número usarás para 2FA y que puedas usar siempre.
✅ Verificación: Tienes un plan claro: cuenta nueva o cambio, método de pago seleccionado, dirección y teléfono listos para 2FA.
Paso 2: Configurar VPN y red
Objetivo: Ajustar entorno de red para que Apple vea una ubicación lógica y el proceso no se complique con verificaciones extra.
Requisitos VPN
- IP estable, preferiblemente dedicada para evitar problemas por compartir con usuarios sospechosos.
- Ruta hacia la región elegida (Turquía o Kazajistán) para registro y pago.
- Baja latencia y ping estable para menos fallos en confirmaciones.
- Protocolos fiables (WireGuard, IKEv2, OpenVPN) y sin registros de actividad.
Puedes usar varias opciones. Un servicio probado para conexiones desde Rusia en 2026 es vpn.how, que ofrece VPN con IP dedicada, soporta WireGuard, OpenVPN, IKEv2, L2TP y SSTP, y tiene servidores en grandes ciudades como Moscú, San Petersburgo, Ámsterdam, Frankfurt, Londres, Nueva York, San José, Chicago, Singapur, Sídney, Madrid, Helsinki, Estocolmo, Varsovia, Copenhague y Stavanger. Acepta tarjetas rusas (Tinkoff, Ozon), pagos por SBP, USDT o BTC. Tarifas desde 490 ₽ por día y 2490 ₽ al mes con descuentos. El servidor se activa en 5 minutos sin registros. No es publicidad, sino recomendación práctica: IP dedicada y variedad de protocolos reducen falsos positivos en verificaciones Apple. Alquilar VPN no requiere tarjeta extranjera, útil si estás en Rusia.
Configuración paso a paso
- Conéctate a la VPN en el dispositivo donde crearás el Apple ID.
- Elige servidor que corresponda a la región objetivo. Para Turquía, con salida a Turquía. Para Kazajistán, con salida a Kazajistán. Si no hay servidores directos, usa el más cercano, consciente de riesgos.
- Usa protocolos IKEv2 o WireGuard para mejor estabilidad y velocidad. Si tu red bloquea estos, cambia a OpenVPN TCP.
- Vacía caché DNS. En iPhone/iPad activa y desactiva modo avión por 10 segundos, o reinicia el dispositivo.
- Verifica tu IP y ubicación mediante cualquier app de geolocalización. Confirma que coincida con la región elegida.
- Desactiva temporalmente funciones que revelen ubicación real, como precisión de ubicación en apps y navegador. Puedes reactivar luego.
Consejo: Registra y agrega pagos usando la misma IP y dispositivo para evitar verificaciones extra.
⚠️ Atención: No cambies la región VPN durante el proceso. Cambios bruscos elevan el riesgo de bloqueos temporales en la cuenta.
✅ Verificación: IP estable, país correcto según servicios de verificación, dispositivo reiniciado o DNS refrescado.
Paso 3: Crear Apple ID para Turquía o Kazajistán
Objetivo: Registrar un Apple ID nuevo en la región correcta con idioma adecuado en la interfaz de la tienda.
Creación vía navegador web
- Confirma que VPN esté activo y la ubicación sea la correcta.
- Abre navegador y ve al formulario para crear Apple ID. Puedes elegir inglés o idioma local para la interfaz, que no afecta la región asignada.
- Ingresa nombre y apellido en caracteres latinos. Ejemplo: Ivan Petrov. Usa datos reales.
- Indica fecha de nacimiento. Ejemplo: 14/09/1995. Importante para recuperación de cuenta.
- Introduce un correo electrónico no vinculado a otros Apple ID. Ejemplo: ivan.petrov.tr@examplemail.com.
- Crea una contraseña segura, mínimo 12 caracteres con mayúsculas, minúsculas, números y símbolos.
- Elige país/región: Turquía o Kazajistán. Confirma.
- Selecciona idioma preferido para interfaz de tienda (puede ser inglés). No fija región pero facilita navegación.
- Indica número de teléfono para 2FA, con código de país si no es local. Debe poder recibir SMS.
- Espera y escribe código recibido por SMS. Confirma creación de cuenta.
Creación directamente en iPhone o iPad
- Abre Ajustes → Iniciar sesión en iPhone (o iPad).
- Pulsa “¿No tienes Apple ID?” y selecciona “Crear Apple ID”.
- Introduce nombre, apellido, fecha de nacimiento, correo electrónico y contraseña.
- Cuando se te solicite seleccionar país/región para servicios multimedia, elige Turquía o Kazajistán.
- Confirma número para 2FA y escribe código recibido por SMS.
- Acepta términos y condiciones, prestando atención a los avisos sobre condiciones regionales.
Consejo: Si al crear desde móvil la región no es la correcta, finaliza registro sin añadir pago y luego, en Ajustes → Multimedia y compras → Ver cuenta → País/región, cambia a la región deseada antes de ingresar a App Store.
✅ Verificación: Al entrar a App Store ves precios en liras turcas (TRY) o tenge kazajo (KZT). Las secciones y rankings de apps corresponden a la región elegida.
Paso 4: Configurar seguridad y verificaciones
Objetivo: Fortalecer la cuenta para evitar bloqueos y problemas mediante 2FA, contraseñas robustas y métodos secundarios de recuperación.
- Activa autenticación de dos factores. Ve a Ajustes → Tu nombre → Contraseña y seguridad → Autenticación de dos factores.
- Añade un número de confianza adicional. Puede ser otro que controles, útil si el principal no está disponible.
- Configura códigos de respaldo si la opción está disponible. Guárdalos en un gestor o imprime y guarda en lugar seguro.
- Revisa la lista de dispositivos de confianza y elimina aquellos que no reconozcas.
- Activa avisos de inicio de sesión para detectar accesos sospechosos.
Consejo: Usa una contraseña larga y única. Por ejemplo, una frase de 20–24 caracteres con espacios y símbolos aumenta la resistencia. Ejemplo: Zakat Tuman 24! seda.
✅ Verificación: En seguridad aparece 2FA activa, número de respaldo añadido y lista de dispositivos correcta.
Paso 5: Añadir métodos de pago para TR/KZ
Objetivo: Vincular un método de pago válido y legal en la región para comprar apps y suscripciones.
Opción 1: Tarjeta bancaria local de la región
- Ve a Ajustes → Tu nombre → Pagos y Envíos.
- Toca «Agregar método de pago».
- Selecciona «Tarjeta de crédito o débito».
- Introduce datos de tarjeta emitida en Turquía o Kazajistán: número, fecha, CVC.
- Completa dirección de facturación acorde a país y tarjeta: ciudad, calle, código postal y teléfono.
- Guarda datos. Si es necesario, realiza la confirmación 3DS en el banco.
Opción 2: Saldo Apple ID con tarjetas regalo
- En App Store toca tu avatar arriba a la derecha.
- Selecciona «Canjear tarjeta regalo o código».
- Introduce código de tarjeta regalo válida para la región (TR o KZ).
- Espera carga de fondos al saldo Apple Account Balance.
Opción 3: Acceso familiar
- El organizador familiar en la misma región te añade a la familia.
- Confirmas invitación en tu dispositivo con el nuevo Apple ID.
- Compras y suscripciones se cargan a la tarjeta del organizador, si está activado pago compartido.
Opción 4: Pago móvil
- Verifica que operador local acepte pagos Apple.
- Inserta SIM local o configura eSIM del operador.
- En Pagos y Envíos selecciona pago vía operador móvil.
⚠️ Atención: Las tarjetas regalo y códigos son estrictamente regionales. La de Turquía no funciona en Kazajistán y viceversa. Verifica país de emisión antes de introducir código. Usa solo fuentes confiables y códigos de origen comprobable.
Consejo: Si la tarjeta no se acepta, revisa la concordancia de país en Apple ID, país de emisión y formato de dirección. Detalles pequeños como formato de código postal o teléfono suelen ser la causa.
✅ Verificación: En Pagos y Envíos ves método activo o saldo cargado. Prueba comprar app gratis o periodo de prueba sin errores.
Paso 6: Dirección y facturación correcta
Objetivo: Completar los datos de dirección para que el sistema acepte pagos sin rechazos.
- Confirma que país del Apple ID coincida con la región: Turquía o Kazajistán.
- Prepara dirección en caracteres latinos. Ejemplos para Turquía: Calle: Inonu Cd 24, Distrito: Sisli, Ciudad: Estambul, Código postal: 34360, Teléfono: +90 5XX XXX XX XX. Para Kazajistán: Calle: Abay Ave 90, Distrito: Bostandyk, Ciudad: Almatý, Código postal: 050000, Teléfono: +7 7XX XXX XX XX.
- Introduce dirección en Ajustes → Pagos y Envíos → Dirección de envío y dirección de facturación.
- Revisa formato de teléfono: código país más número sin espacios extra si el formulario es sensible.
- Guarda cambios y espera confirmación sin error.
Consejo: El código postal debe coincidir con la ciudad. Si dudas, consulta un mapa postal oficial. Código erróneo es causa común de rechazo.
✅ Verificación: Dirección guardada, método de pago activo y descarga gratis sin pedir dirección nuevamente.
Paso 7: Iniciar sesión en dispositivos y configuración inicial
Objetivo: Acceder correctamente con el nuevo Apple ID en iPhone, iPad o Mac y comprobar que tienda y servicios funcionan.
En iPhone o iPad
- Abre Ajustes → Multimedia y compras.
- Si antes usaste otro Apple ID para tienda, pulsa «Cerrar sesión».
- Toca «Iniciar sesión» e ingresa nuevo Apple ID para región TR o KZ.
- Confirma inicio con código 2FA.
- Abre App Store y confirma que moneda y contenidos concuerdan con la región.
- Descarga una app gratis para validar acceso y evitar bloqueos.
En Mac
- Abre App Store.
- En menú Store selecciona Cerrar sesión y luego Iniciar sesión con nuevo Apple ID.
- Confirma con 2FA.
- Instala utilitario gratuito para comprobaciones.
Consejo: Si quieres conservar iCloud en el Apple ID antiguo, no cambies el inicio de sesión en Ajustes → Tu nombre. Modifica solo el inicio para «Multimedia y compras». Así mantienes fotos, notas y iCloud Drive sin afectar.
✅ Verificación: Descargaste app gratis exitosamente, la moneda es local y no hubo errores de autenticación.
Paso 8: Primeras compras y suscripciones
Objetivo: Realizar la primera compra sencilla, verificar cobros automáticos y aprender a gestionar suscripciones en la nueva región.
- En App Store busca app con compras dentro o suscripción económica.
- Presiona «Comprar» y confirma pago con método elegido. Si usas saldo, asegúrate de que hay suficiente.
- Si piden 3DS, confirma en la app del banco si pagas con tarjeta.
- En Ajustes → Tu nombre → Suscripciones verifica que las nuevas estén activas.
- En «Métodos de pago» confirma que tu método está principal y sin errores.
- Si la suscripción tiene periodo de prueba, anota la fecha fin para decidir si renovar.
Consejo: Para la primera compra, elige un precio bajo o plan mensual para testar facturación sin gastar mucho y detectar posibles problemas temprano.
✅ Verificación: Compra exitosa, suscripción visible y activa, sin mensajes de error o problemas con el pago.
Chequeo final
Reúne todas las verificaciones en una lista:
- La App Store muestra precios en TRY (Turquía) o KZT (Kazajistán).
- 2FA activado, con número de respaldo y códigos configurados.
- Método de pago activo o saldo cargado.
- Dirección y código postal corresponden a la región, y teléfono aceptado.
- Pudiste descargar app gratis y hacer compra de prueba.
- La suscripción aparece bien y los cargos se efectúan correctamente.
Prueba también: acceso desde otro dispositivo con la misma cuenta, descarga de contenido gratuito y pago, cancelar y renovar suscripción. Los indicadores de éxito son: sin errores en app store, login estable, cargos efectivos y actualizaciones funcionando sin problemas.
Errores comunes y soluciones
- Problema: “Tu método de pago fue rechazado”. Causa: Desajuste entre país de tarjeta y región, dirección o código postal incorrectos. Solución: Usa tarjeta emitida en la región o paga con saldo de tarjetas regalo. Revisa formato de dirección y código postal.
- Problema: No llega código SMS para 2FA. Causa: Bloqueo de SMS internacionales, roaming o retrasos del operador. Solución: Cambia a red 3G o Wi-Fi Calling, desactiva VPN temporal para recibir SMS, añade número de respaldo o usa dispositivo de confianza para confirmación.
- Problema: La tienda muestra región antigua. Causa: Caché o cambio de región incompleto. Solución: Sal de multimedia y compras, reinicia dispositivo y vuelve a ingresar. Verifica País/región en ajustes de cuenta.
- Problema: Error al canjear tarjeta regalo. Causa: Código no es de región correcta o ya usado. Solución: Verifica región del código y compra solo en fuentes confiables. Contacta al soporte del vendedor si hay disputa.
- Problema: Solicitudes frecuentes de confirmación o bloqueos temporales. Causa: Cambios bruscos de IP o ubicación, actividad sospechosa. Solución: Usa IP dedicada estable, no cambies ubicación durante el proceso, espera a que termine restricción y prueba más tarde.
- Problema: No se puede cambiar región de ID existente. Causa: Suscripciones activas o saldo positivo. Solución: Cancela suscripciones, espera finalización, elimina saldo y luego modifica región.
- Problema: Pago rechazado por el banco. Causa: No pasó 3DS o control anti fraude. Solución: Confirma pago en app bancaria, activa notificaciones, verifica límites y autorización para pagos internacionales online.
Opciones adicionales
Configuraciones avanzadas de seguridad
- Marca Apple ID como «crítico» en gestor de contraseñas e activa monitoreo de fugas.
- Agrega dispositivo de respaldo en macOS para confirmaciones 2FA.
Optimización de la red
- Asigna la misma IP para todas las sesiones del Apple ID, especialmente durante primeras semanas.
- Si hay retrasos, cambia protocolo VPN: WireGuard a IKEv2 o a OpenVPN TCP.
Escenarios alternativos de pago
- Configura vía Acceso Familiar, donde organizador reside legalmente en región y tiene tarjeta válida.
- Combina saldo y cobros esporádicos con tarjeta para minimizar fallos.
Consejo: Guarda capturas de pago y recibos exitosos. Facilita resolver disputas con soporte y monitorear cambios en ajustes.
Preguntas frecuentes
Pregunta: ¿Puedo usar tarjeta rusa directamente en tienda turca o kazaja? Respuesta: En 2026, generalmente no. Usa tarjetas locales, códigos regalo para saldo o acceso familiar con organizador en región.
Pregunta: ¿Es obligatorio mantener VPN activa? Respuesta: Sí, durante registro y agregado de pagos para estabilidad. Luego es recomendable mantener misma IP para pagos y cambios de perfil. Para descargas habituales, a veces no es necesario, pero aumentan riesgos de verificaciones.
Pregunta: ¿Qué pasa con mis compras antiguas? Respuesta: Si creas Apple ID nuevo, las compras quedan en la cuenta anterior. Si cambias región en cuenta existente, parte del contenido puede perderse y algunas suscripciones deben renovarse.
Pregunta: ¿Puedo usar un número telefónico para dos Apple ID? Respuesta: Sí, pero lleva registro de qué número usa cada cuenta. Es mejor tener números de respaldo para evitar confusión y problemas de recuperación.
Pregunta: ¿Por qué rechazan tarjeta regalo? Respuesta: Por código con región incorrecta o activación repetida. Revisa compatibilidad geográfica y compra en vendedores confiables.
Pregunta: ¿Cómo reducir riesgo de bloqueos? Respuesta: Usa IP dedicada estable, ubicación coherente, dirección de facturación correcta, métodos legales y evita cambios bruscos de región.
Pregunta: ¿Se puede usar un Apple ID para iCloud y otro para App Store? Respuesta: Sí, en iPhone y iPad usa la cuenta principal para iCloud y la regional para «Multimedia y compras». Es práctica común y segura.
Pregunta: Si me traslado físicamente, ¿debo actualizar configuraciones? Respuesta: Sí. Cuando tengas SIM y tarjeta locales, actualiza dirección y pago para mayor estabilidad y menos verificaciones.
Pregunta: ¿Qué hacer si la suscripción no se renueva? Respuesta: Revisa método de pago, saldo y estado 3DS con el banco. Intenta pago con otro método o un día más tarde si hubo bloqueo antifraude.
Pregunta: ¿Es peligroso cambiar servidores VPN frecuentemente? Respuesta: Evita cambiar países a menudo. Si debes, elige servidores en la misma región y preferiblemente con la misma IP dedicada.
Conclusión
Has aprendido a crear y configurar un Apple ID para las regiones de Turquía o Kazajistán en 2026, a preparar red y VPN adecuadamente, activar 2FA de forma segura, añadir métodos de pago y realizar las primeras compras. Vimos riesgos, errores comunes y cómo solucionarlos, además de cómo comprobar que todo funciona. Si optaste por cuenta separada, sigue usando la principal para iCloud y la nueva para multimedia; esto reduce riesgos y protege tus datos. Si cambiaste región de forma definitiva, controla suscripciones, revisa métodos de pago y mantén IP estable en acciones críticas.
Después podrás ampliar tu colección de apps y servicios, conectar suscripciones familiares, optimizar la red y configurar métodos de pago alternativos. Respeta las condiciones del servicio, utiliza pagos legales y no falsees información personal. Así mantendrás la cuenta estable y segura a largo plazo.
Consejo: Cada tres meses realiza una mini auditoría: verifica métodos de pago, números 2FA de respaldo, suscripciones activas y notificaciones del banco. Esta revisión preventiva ahorra tiempo y dinero.