VPN on Apple Vision Pro: WireGuard and IKEv2 — Step-by-Step Guide from Start to Finish
A complete hands-on guide to setting up VPN on Apple Vision Pro: how to choose the right protocol, prepare configs, install WireGuard and IKEv2, manage visionOS limitations, and ensure security. Get a reliable, manageable VPN in 60–90 minutes.
Content of the article
- Introduction
- Preparation
- Basic concepts
- Step 1: choose protocol and use case
- Step 2: obtain and prepare configurations
- Step 3: install and configure wireguard on apple vision pro
- Step 4: manual ikev2 setup in visionos
- Step 5: configure split-tunnel and leak-free dns
- Step 6: auto-connect, kill switch, and sleep behavior
- Step 7: transfer and import configs via icloud drive, airdrop, and qr
- Step 8: optimize performance and mtu
- Step 9: account for visionos limitations and safe operation
- Result verification
- Common issues and fixes
- Additional features
- Faq
- Conclusion
Introduction
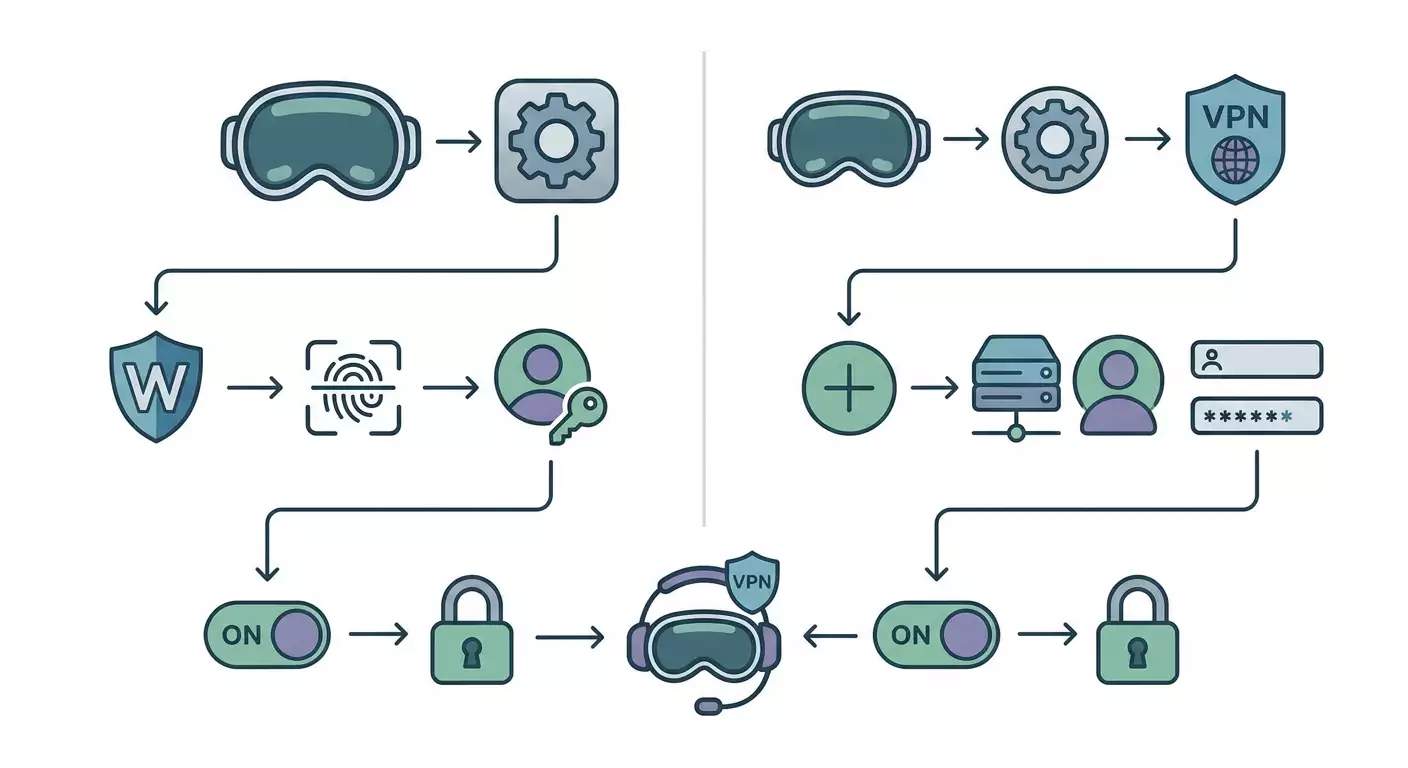
In this practical guide, you'll learn how to set up VPN on Apple Vision Pro step by step using two methods: WireGuard and IKEv2. You'll get a working, verifiable connection, understand how to work within visionOS limitations, set up auto-connect, and avoid common pitfalls. By the end, you'll have a clear, repeatable process you can adapt for personal or corporate needs.
This guide is aimed at beginners who haven't configured VPN on Vision Pro before but also includes advanced sections for those who want to fine-tune split-tunneling, DNS, MTU, .mobileconfig profiles, and auto-connect rules. Terms are explained in plain language, with ready steps and alternatives if something isn't available or stable.
Before you start, it's helpful to have a basic understanding of what VPN is and why you need it: encrypting traffic, privacy, bypassing blocks, and accessing resources remotely. But even if you’re new to this, we've got you covered in the basics section. You'll also need to interact with the Vision Pro interface using touch and gestures like finger pointing, tapping, and turning the Digital Crown — all described clearly.
Time estimate: a full setup usually takes 60–90 minutes. If you already have ready WireGuard or IKEv2 configs, you can finish in 15–30 minutes. Setting up your own server may take 2–3 hours, including key generation and testing.
Preparation
Before you begin, make sure you have everything you need. This will speed up setup and avoid interruptions halfway through.
Required Tools and Access
- Apple Vision Pro running the latest visionOS version. It's best to update to the newest minor version before starting.
- Active Apple ID and stable Wi‑Fi internet. Ensure your network is stable and doesn’t block UDP traffic if you plan to use WireGuard.
- VPN credentials: For WireGuard — private and public keys, server address, port, AllowedIPs, DNS; For IKEv2 — server address or domain, login/password or certificates, Remote ID, Local ID, policies.
- Optional: Mac, iPhone, or iPad to generate configs if doing it yourself, and to transfer files to Vision Pro via iCloud Drive or AirDrop.
System Requirements
- visionOS supports network extensions for VPN apps. This means WireGuard-class apps can run, and there’s a system section for IKEv2 profiles.
- For a stable WireGuard connection, UDP port 51820 is recommended (other ports work too); for IKEv2 — UDP ports 500 and 4500 (NAT-T). If those ports are blocked on your network, consider alternatives like shifting WireGuard to 443/udp.
What to Download or Install
- WireGuard app from the App Store on Vision Pro. Search for “WireGuard” by WireGuard LLC. If the official app isn’t available in your region or for visionOS, use a compatible client supporting WireGuard profiles. Alternative instructions are provided below.
- Configuration files: .conf for WireGuard, .mobileconfig or manual settings for IKEv2. If using a personal VPN provider, download the ready configs beforehand.
Backups
Backing up is critical if you’re using your own keys or certificates. Store your WireGuard private keys safely in a trusted password manager. Keep exported IKEv2 .mobileconfig profiles encrypted. Losing keys means losing access.
⚠️ Warning: Never share your WireGuard private keys or send them via unsecured channels. If you suspect a key has been compromised, generate a new one immediately and revoke the old access on the server.
Tip: Keep all your settings in a separate note: server address, port, protocol type, login/password (if IKEv2), AllowedIPs list, DNS. It speeds up data entry on Vision Pro and reduces errors.
Basic Concepts
To confidently follow the instructions, let's briefly explain key terms. This will help you understand why certain options are enabled and how to troubleshoot.
- VPN — a secure tunnel between your device and a server. It encrypts traffic and can change your external IP address.
- WireGuard — a modern UDP-based VPN protocol with simple configs and high speed. It uses a key pair: private and public.
- IKEv2 — an IPsec-based protocol. Works well with corporate infrastructure, handles network changes robustly, supports certificates and EAP authentication.
- Endpoint — server address and port your client connects to.
- AllowedIPs — list of addresses/subnets routed through the WireGuard tunnel. 0.0.0.0/0 and ::/0 mean "all traffic through VPN."
- Split tunnel — only select traffic goes through VPN; the rest accesses directly.
- NAT-T — IPsec-over-UDP encapsulation for NAT and firewall traversal. Used by IKEv2.
- DNS — name servers. To prevent leaks, VPN provider DNS servers are usually specified.
- MTU — maximum packet size. Incorrect MTU can cause connection drops or stalls.
Tip: If unsure where to start, choose WireGuard. It’s simpler for manual setup and usually offers better speed under equal conditions.
Step 1: Choose Protocol and Use Case
Goal
Decide which protocol to use on Vision Pro: WireGuard or IKEv2. This lets you follow the correct steps without unnecessary detours.
Step-by-Step
- Define your goal. Need a fast, versatile tunnel without complex PKI? Choose WireGuard. Integrating into corporate environments with certificates? Choose IKEv2.
- Check your network. If Wi‑Fi restricts UDP or blocks non-standard ports, IKEv2 (UDP 500/4500) might be more reliable. WireGuard can be shifted to 443/udp.
- Consider convenience. WireGuard is easy to import via file or QR code. IKEv2 suits mass deployment via .mobileconfig profiles.
- Make your choice and note it down: “Using WireGuard” or “Using IKEv2.”
Important: You can set up both and toggle as needed. Don’t run two VPN tunnels simultaneously — keep one active at a time.
✅ Check: You have recorded which protocol you start with and understand why it fits your scenario.
Tip: Familiar with corporate profiles and MDM? Start with IKEv2. Need flexibility and simple config updates? Go with WireGuard.
Step 2: Obtain and Prepare Configurations
Goal
Acquire working configs for WireGuard or IKEv2. These can be provider files or custom-made on your own server.
Option A: Ready Personal VPN
- Pick a provider offering a personal server, not shared access. This gives you a dedicated IP and stability against blocks affecting shared nodes.
- After payment, access your dashboard and download configs for supported protocols. Look for WireGuard, IKEv2, and possibly OpenVPN for network fallback.
- Save .conf files (WireGuard) and .mobileconfig files (IKEv2) to iCloud Drive or transfer via AirDrop. Name them clearly to avoid confusion.
Expert Tip: For quick and reliable Vision Pro VPN, check out vpn.how. It provides personal servers with dedicated IPs, supporting WireGuard, OpenVPN, IKEv2, L2TP, SSTP. Servers are located worldwide, including Moscow, Amsterdam, New York, Singapore, and more. Payment methods include Russian cards, USDT/BTC. Plans start at 490₽/day or 2490₽/month, with auto-start in 5 minutes and no logs. Ready WireGuard and IKEv2 configs are immediately available in your account for fast import into Vision Pro clients, saving time and minimizing errors.
Option B: Manual WireGuard Setup
- On an Ubuntu server, install WireGuard packages. Ensure UDP port is open on your firewall.
- Generate key pairs for server and clients. Keep private keys secret.
- Create server config: set interface, client IP subnets, port, routing rules. Enable forwarding if internet access is needed.
- Add client peer with public key and AllowedIPs. Start and enable WireGuard service on server.
- Create client .conf for Vision Pro: specify client private key, client address, server Endpoint, AllowedIPs, and VPN provider DNS.
- Verify server is reachable on the set port. Use port 443/udp if you need to bypass filtering.
Option C: Manual IKEv2 Setup
- Install IPsec stack (e.g., strongSwan) on server. Generate root and server certificates. For EAP-MSCHAPv2, create user accounts with logins and passwords.
- Configure IKEv2 profile: cryptographic suites, client address pools, NAT-T rules, encryption policies. Open UDP ports 500 and 4500.
- Prepare .mobileconfig profile for Vision Pro: server address, Remote ID, Local ID, auth method (EAP with login/password or cert), Send All Traffic or split-tunnel, DNS.
- Import CA certificate on device if it’s not publicly trusted. Verify trust chain is error-free.
⚠️ Warning: Avoid weak ciphers and outdated protocols. For IKEv2 disable insecure cipher suites and auth methods. Don’t email or message your WireGuard private keys without encryption.
✅ Check: You have at least one working setup: WireGuard .conf file or IKEv2 .mobileconfig and related credentials (login/password or certificates). Files are saved in iCloud Drive or ready to send via AirDrop.
Tip: Name your configs meaningfully, e.g., wg-frankfurt-home.conf or ikev2-ny-work.mobileconfig. It makes choosing tunnels on your device easier.
Step 3: Install and Configure WireGuard on Apple Vision Pro
Goal
Install the WireGuard client on visionOS and import your config so the connection runs smoothly in typical Vision Pro use cases.
Step-by-Step
- Open the App Store on Apple Vision Pro. Focus on the search box, tap, and type "WireGuard." Find WireGuard by WireGuard LLC.
- Tap "Get" or the download icon and confirm installation. Wait until the "Open" button appears.
- Launch WireGuard. The main screen shows a list of tunnels (empty at first) and an "Add a tunnel" button or a "+" icon.
- Import your config. Choose "Create from file or archive" and select your .conf stored in iCloud Drive. Alternatively, pick "Create from QR code" if you have a QR code from your server or dashboard.
- Verify imported fields: Name (tunnel’s name), Public Key, Addresses, DNS servers, Peer Endpoint, AllowedIPs, PersistentKeepalive. Make sure these match your provider’s or server’s info.
- Enable security features. If “Block untunneled traffic” (kill switch) is supported, turn it on to prevent leaks if the tunnel drops.
- Toggle the switch next to your tunnel to connect. The first time, the system will ask permission to add a VPN profile — approve it.
- Wait for the "Connected" status and traffic stats to appear. Connecting usually takes 1–5 seconds.
Important: Some visionOS versions may handle auto-connect and kill switch options differently than iOS. If you don’t see these toggles, check your tunnel settings and app version.
Tip: If UDP ports are blocked on your network, ask your provider for a WireGuard config using port 443/udp. This helps bypass restrictive Wi-Fi networks.
✅ Check: WireGuard shows "Connected," traffic counters increase, and reconnecting is faster. The system settings panel shows an active VPN icon.
Potential Issues and Fixes
- Can't find WireGuard in the App Store. Likely reasons: regional restrictions or incompatible version. Solution: use a compatible client with WireGuard support or generate configs on iPhone/iPad and transfer files to Vision Pro.
- Stuck at "Connecting" and disconnects. Cause: UDP port blocked. Solution: switch port to 443/udp and enable PersistentKeepalive with 25 seconds interval.
- Connected but no traffic flows. Cause: incorrect AllowedIPs or DNS. Solution: for full tunnel, use 0.0.0.0/0 and ::/0 and set proper DNS servers.
Step 4: Manual IKEv2 Setup in visionOS
Goal
Add an IKEv2 connection via visionOS settings manually or using a profile for corporate policies and certificates.
Manual Entry Steps
- Open "Settings" on Vision Pro. Scroll to "VPN" and open it.
- Tap "Add VPN Configuration." Select "IKEv2" as the type.
- Enter a description, e.g., "Work IKEv2."
- Input the server domain or IP address.
- In "Remote ID," enter the server FQDN or the value given by your admin. Leave "Local ID" empty unless your policy requires it.
- Under "Authentication," choose "Username" for EAP-MSCHAPv2 or "Certificate" if client certs are used. For username, enter login and password. For certs, install the client certificate beforehand and select it here.
- Scroll down and ensure "Proxy" is off unless policy states otherwise.
- Save the config, return to VPN screen, and toggle status to "Connected."
Installing .mobileconfig Profile
- Place your .mobileconfig file into iCloud Drive or send it to Vision Pro via AirDrop.
- Open "Files," find the profile, and tap to install. The system will display profile info and ask for confirmation.
- Confirm installation and enter your device passcode if prompted. Trust certificates if the profile installs any.
- Go to "Settings" → "VPN" and activate the new connection.
Important: For IKEv2 with certificate validation, ensure the CA root certificate is installed and trusted. Otherwise, you’ll get authentication errors or warnings about an untrusted server.
Tip: If using split-tunnel with IKEv2, prepare a profile with "Send All Traffic" disabled and routes set for specific subnets. This can’t always be done manually in the UI — profiles give full control.
✅ Check: The new IKEv2 connection appears under "VPN," connects without errors in 2–10 seconds.
Common Issues and Solutions
- Authentication error. Cause: wrong login/password or untrusted server cert. Fix: double-check credentials, install CA cert, retry.
- Connected but no internet. Cause: split-tunnel policy or routing. Fix: enable "Send All Traffic" or add routes and DNS in profile.
- Frequent disconnects with DPD messages. Cause: unstable network or MTU issues. Fix: optimize MTU on server, ensure NAT-T functions properly.
Step 5: Configure Split-Tunnel and Leak-Free DNS
Goal
Set VPN so only required traffic routes through it (or all traffic if desired) and prevent DNS leaks outside the tunnel.
WireGuard
- Open your tunnel in the WireGuard app and enter edit mode.
- For full tunnel, set AllowedIPs to 0.0.0.0/0 and ::/0 to route all traffic via VPN.
- For split-tunnel, list only needed subnets, such as 10.0.0.0/8 and 192.168.0.0/16, plus any required public addresses.
- Specify DNS servers from your VPN provider or secure public resolvers supporting encryption to prevent leaks.
- Save changes and reconnect the tunnel.
IKEv2
- With a .mobileconfig profile, toggle "Send All Traffic" on or off. For split-tunnel, disable it and define specific subnet routes.
- Set DNS servers in the profile to use during the active tunnel to avoid leaks via local network.
- Install the updated profile and reconnect.
Tip: If you travel frequently and deal with varying networks, prepare two profiles: "Full-tunnel" and "Split-tunnel." Switch between them easily without editing configs on the fly.
✅ Check: After connecting, search "my IP" online. Your external IP should match the VPN server. For split-tunnel, verify access to resources inside routed subnets and confirm local sites outside the tunnel open directly.
Common Issues and Fixes
- DNS leaks. Cause: DNS not set in config. Fix: add VPN DNS servers and restart tunnel.
- Local devices unreachable on full tunnel. Cause: all traffic routed through VPN. Fix: switch to split-tunnel and exclude local subnet routes.
- High latency. Cause: full tunnel to distant server. Fix: choose a nearby POP or use split-tunnel for heavy apps.
Step 6: Auto-Connect, Kill Switch, and Sleep Behavior
Goal
Make your VPN as autonomous as possible: auto-start on boot, reconnect after sleep, and protect traffic on drop.
WireGuard
- Open tunnel settings and enable On-Demand or similar if your visionOS client supports it. Set trigger conditions like "Always" or "When accessing certain domains/networks."
- Enable "Block untunneled traffic" (kill switch) to block traffic if the tunnel fails.
- Set PersistentKeepalive to 25 seconds if your network’s NAT closes idle connections.
IKEv2
- Use a .mobileconfig profile with On-Demand policies. Specify rules to connect when accessing certain domains or on all networks except trusted Wi-Fi.
- For kill switch-like behavior, use "Send All Traffic" with On-Demand Always and disallow bypass in the profile. Note that behavior may differ from iOS — test in your environment.
- Check how VPN behaves when you remove or put on the Vision Pro headset. Adjust On-Demand settings if needed.
⚠️ Warning: Some visionOS versions may have different On-Demand implementations and VPN app behaviors than iPhone/iPad. Test sleep and wake scenarios thoroughly on your device and network.
Tip: If you switch networks often (home, office, cafe), create a separate On-Demand profile with exclusions for "trusted" Wi-Fi. This way, VPN stays off at home but activates automatically on public networks.
✅ Check: Restart Vision Pro or toggle Wi-Fi. VPN should automatically connect and show "Connected." With kill switch enabled, no traffic leaks when VPN is forcibly disconnected.
Step 7: Transfer and Import Configs via iCloud Drive, AirDrop, and QR
Goal
Safely and efficiently transfer your configs to Vision Pro without data loss or confusion.
Step-by-Step
- If using iCloud Drive: put your .conf or .mobileconfig files into a VPN folder on your Mac or iPhone. On Vision Pro, open "Files," go to iCloud Drive, and locate the VPN folder.
- If using AirDrop: select the file on your sending device and send it to Vision Pro. Accept and save it in "Files."
- For WireGuard and QR: open the WireGuard app, choose "Create from QR code," look at the QR on screen, and confirm the scan. Verify the parsed fields before saving.
- For IKEv2 .mobileconfig: tap the file in "Files" and confirm profile installation. Enter the device passcode and complete the process.
Tip: Keep original config files off your device, stored only in encrypted storage. On Vision Pro, keep only copies for quick replacement if keys are compromised or changed.
✅ Check: Files are accessible in "Files." WireGuard shows imported tunnels, and "VPN" settings display installed IKEv2 profiles.
Common Issues and Fixes
- File won’t open from "Files." Cause: unknown type or corruption. Fix: rename to have correct extension (.conf or .mobileconfig) and resend.
- QR not scanning. Cause: low quality or wrong format. Fix: regenerate QR with high contrast and no excessive margins.
Step 8: Optimize Performance and MTU
Goal
Achieve stable speeds and reduce connection drops from packet fragmentation.
WireGuard
- Test speeds from different server locations. If latency is high, pick a closer node.
- If pages load slowly, try lowering MTU in the client config by 20–60 from default. Test step by step.
- Add PersistentKeepalive 25 seconds if your NAT is aggressive to keep the tunnel alive.
IKEv2
- Ensure NAT-T is working correctly and not blocked by your router.
- Check crypto suites: very heavy ciphers may slow down weak devices, but Vision Pro should handle them fine. Balance security with speed.
- If disconnects persist, lower MTU on the IPsec server side and test.
Tip: Start simple: switch server to the nearest POP and reconnect. This often improves performance more than tweaking MTU.
✅ Check: Speed and stability improve, pages load smoothly, streaming and calls are uninterrupted. Packet counters in WireGuard/IKEv2 update steadily without plateaus or timeouts.
Step 9: Account for visionOS Limitations and Safe Operation
Goal
Understand visionOS-specific behaviors to set expectations and avoid unexpected drops or leaks in common use cases.
Key Points
- VPN apps on visionOS use network extensions similar to iOS/iPadOS, but exact options (On-Demand, kill switch) may be limited or different in the client UI.
- The system VPN section supports IKEv2 profiles. Always-On policies for unsupervised devices are usually limited. MDM solutions may offer advanced settings.
- Vision Pro has no cellular support; you rely on Wi-Fi. Use reliable networks and ensure your router handles UDP and IPsec properly.
- Removing or putting on the headset can cause brief pauses. Test how your VPN reconnects based on your chosen rules.
Tip: If you use VPN to access geo-restricted content, save nodes in multiple countries. Switch between them in two taps without editing configs.
✅ Check: You know which options your visionOS client supports and have tested VPN functionality in everyday activities: browsing, calls, corporate resource access.
Result Verification
Checklist
- WireGuard: tunnel connects, counters visible, traffic flows.
- IKEv2: status shows "Connected" without errors, resources accessible.
- No DNS leaks: requests go to VPN-assigned DNS servers.
- Split-tunnel: designated subnets route through VPN, other traffic direct.
- Auto-connect works as intended; traffic is blocked if the tunnel drops (kill switch).
How to Test
- Check your external IP by searching "my IP" and confirm it matches the VPN server location.
- Access resources that should only be available via VPN, like internal addresses or region-restricted content.
- Turn Wi-Fi off and on; see if VPN reconnects automatically.
- Test streaming video latency and buffering for signs of disruption.
Success Indicators
- Connection establishes in 1–10 seconds and stays stable during normal use.
- No DNS leaks; content loads with expected geolocation.
- Split-tunnel routes behave as planned.
- VPN responds predictably to network changes and sleep/wake cycles.
Tip: Document your final setup: installed profiles, where original configs are stored, who maintains them. It makes support easier.
Common Issues and Fixes
- Issue: WireGuard missing in Vision Pro App Store. Cause: Region or version incompatibility. Fix: Use a compatible client that supports WireGuard profiles or import configs via iPhone/iPad and transfer them. Keep .conf files handy for quick client changes.
- Issue: IKEv2 connects but websites don’t load. Cause: Routing or DNS policy misconfiguration. Fix: Enable "Send All Traffic" or adjust routes and DNS. Reconnect.
- Issue: Frequent drops. Cause: MTU and fragmentation. Fix: Lower MTU in WireGuard client or IKEv2 server, add PersistentKeepalive, check Wi-Fi quality.
- Issue: No local network device access. Cause: Full tunnel routes all traffic. Fix: Configure split-tunnel excluding local subnets.
- Issue: Certificate errors with IKEv2. Cause: Untrusted CA or mismatched CN and FQDN. Fix: Install correct CA, verify Remote ID, reissue server cert.
- Issue: Wi-Fi blocks UDP. Cause: Restrictive access point policies. Fix: Move WireGuard to 443/udp or use IKEv2 with NAT-T. If needed, switch to compatible TCP clients/protocols.
- Issue: Significant speed drops. Cause: Distant server or overloaded node. Fix: Choose closer POP, try alternative cities, use split-tunnel for heavy traffic.
Tip: For troubleshooting, grab client logs and temporarily simplify configs. Fewer variables speed up pinpointing the cause.
Additional Features
Advanced Settings
- Multi-profile: keep several configs on device for different networks and tasks, e.g., “Full,” “Split,” “Corporate.”
- Multiple protocols: store both WireGuard and IKEv2. Useful when unexpected filtering occurs.
- Enhanced DNS: use encrypted resolvers on VPN side to reduce metadata leaks.
Optimization
- On-Demand auto-rules: for IKEv2 define conditions by SSID, domains, and connection types. For WireGuard use built-in client options if available.
- Performance tuning: adjust MTU, monitor server load if you host it.
More You Can Do
- Two-factor authentication for config and server management, encrypted storages, key rotation logs.
- Shortcuts automation: create buttons to quickly toggle VPN if supported.
- Redundancy: have a backup server in another jurisdiction for emergencies.
Tip: Regularly review configs and keys. Schedule key rotation every 6–12 months to boost security.
FAQ
- Can I have WireGuard and IKEv2 active at the same time? No, use only one active tunnel to prevent route conflicts and instability.
- Do I need admin rights on Vision Pro to install VPN? No, standard user privileges suffice for profiles and apps. MDM policies require a management profile.
- How fast can I switch between locations? Import multiple configs with clear names. With one tap, disable one tunnel and enable another.
- What if VPN disconnects when I remove the headset? Enable On-Demand and Keepalive. Test auto-reconnect and adjust rules if it disconnects too often.
- How to remove unused profiles? For WireGuard, delete tunnels in the app. For IKEv2, delete the profile in "Settings" → "VPN" or "Profiles & Device Management."
- Are corporate certificates supported? Yes, install CA and client cert on Vision Pro and use them in IKEv2 profiles.
- Can I set up "always-on" VPN? Unsupervised devices have limitations. Combine On-Demand with bypass disallow in profiles and thoroughly test on your visionOS version.
- How to collect logs for support? In WireGuard client, export logs from tunnel details. For IKEv2, enable extended server logs and correlate event times.
- Why does speed drop during peak hours? Possible node overload. Switch server location or use the nearest POP. Check Wi-Fi for interference.
- Is there a risk of DNS leaks? Yes, if you don’t set DNS inside the profile. Always specify VPN DNS servers and verify after connecting.
Conclusion
You’ve set up VPN on Apple Vision Pro using both WireGuard and IKEv2. You now have proven import methods, understand split-tunnel, DNS, and MTU, can configure auto-connect and kill switch when needed. You learned to transfer configs via iCloud Drive, AirDrop, and QR codes, take visionOS limitations into account, and troubleshoot common issues.
Your next steps can be expanding configs with multiple locations, separating profiles for home and public networks, and implementing key and certificate rotation. For corporate use, prepare .mobileconfig profiles with required policies; for personal use, keep a set of WireGuard configs for different cities to quickly change routes and locations.
Most importantly, keep security in mind: store private keys and profiles encrypted, test changes on a single config first, and keep notes. That way, your VPN on Vision Pro will be fast, stable, and reliable — just the way a good VPN should be.