Nintendo Switch 2 and VPN in 2026: How to Set Up Game and eShop Access — Step-by-Step Guide
Learn how to configure VPN for Nintendo Switch 2 via router or computer, properly select your eShop region, and reduce network issues. Prepare your account, set up WireGuard/OpenVPN correctly, and check NAT type. Result: stable online play and access to the desired game library.
Content of the article
- Introduction
- Preliminary preparation
- Basic concepts
- Step 1: update your switch 2 and set up your nintendo account
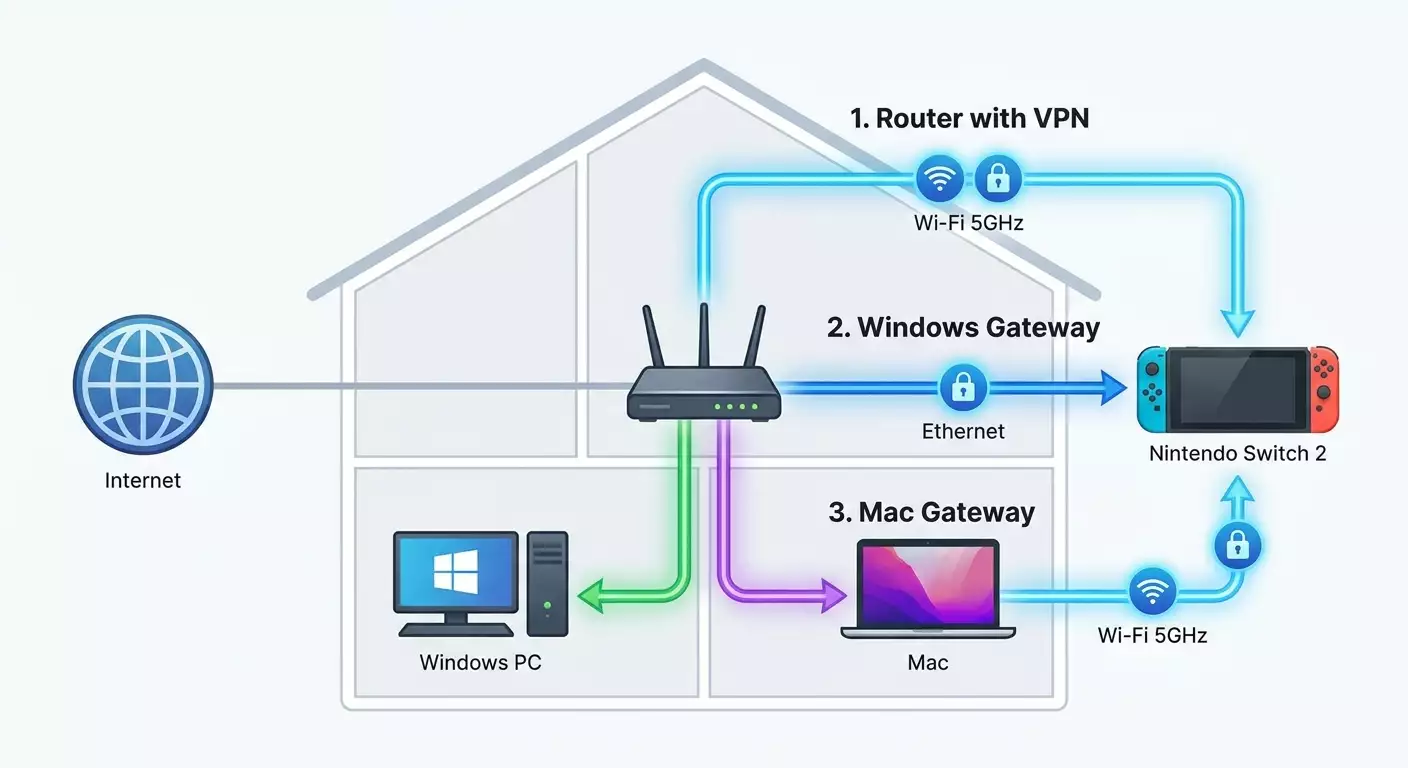
- Step 2: choose your vpn connection method for switch 2
- Step 3: set up vpn on your home router (wireguard/openvpn)
- Step 4: precise routing and optimization (pbr, dns, mtu)
- Step 5: set up vpn on windows 10/11 (wi-fi/ethernet sharing)
- Step 6: set up vpn on macos (internet sharing)
- Step 7: connect switch 2 to network and verify nat properly
- Step 8: regional details for eshop and payments
- Step 9: recommendations for choosing a vpn provider and configs
- Verifying the result
- Common issues and fixes
- Additional features
- Faq
- Conclusion
Introduction
In this step-by-step guide, you’ll set up a stable internet connection for your Nintendo Switch 2 using a VPN, get familiar with account region settings and the eShop, and learn how to test your connection quality and fix common issues. By the end, you'll be ready to play online safely, manage your store region, and minimize lag and NAT problems. We'll cover three methods: via home router, Windows PC, and Mac sharing. Plus, you’ll get practical tips, tricks, and tests to verify success.
This guide suits both beginners new to VPNs on consoles and advanced users looking for fine-tuned settings like policy-based routing, protocol choices (WireGuard, OpenVPN, IKEv2), fixed IP for the console, and separate routing for eShop and game traffic. We explain everything clearly and walk you through every click and menu item.
Before you start, keep in mind: the goal with a VPN here is privacy, stable connections to game servers, and proper access to online services and the eShop catalog when traveling. We don’t cover violating service terms. Use these settings responsibly, in line with your country's laws and Nintendo's rules.
Expected time: basic setup via router takes about 25–45 minutes including restarts and updates; Windows/Mac sharing takes 30–50 minutes; advanced routing and NAT fixes can take up to 60–80 minutes. Most time goes into prepping, importing configs, and testing.
Preliminary Preparation
For a smooth setup, gather all tools and access in advance to save time and avoid errors mid-configuration.
Required Tools and Access
- A Nintendo Switch 2 with the latest system firmware.
- A home router that supports VPN clients (preferably WireGuard or OpenVPN). Many models with AsusWRT/Merlin, Keenetic, TP-Link (models with VPN client), OpenWrt/GL.iNet will work.
- If your router lacks VPN support: a Windows 10/11 PC or Mac to share VPN internet (Wi-Fi or Ethernet) with your console.
- Access to a VPN provider or a personal VPN server with ready WireGuard/OpenVPN/IKEv2 configurations. You’ll need config files and login credentials.
- A Nintendo Account, including password and access to email/2FA.
System Requirements and Network
- Stable internet connection at 20–50 Mbps or better for gaming and updates. The faster, the smoother loading of large games.
- Dual-band Wi-Fi (2.4/5 GHz). Prefer 5 GHz (channels 36–48, 149–161) for lowest latency.
- If possible, use wired connections for the PC gateway or a USB-LAN adapter for your Switch console if compatible.
What to Download and Prepare
- VPN configurations: WireGuard .conf files or OpenVPN .ovpn files. For IKEv2, server parameters, certificates, and username/password.
- VPN client apps: WireGuard for Windows/Mac, OpenVPN for Windows/Mac if needed; routers usually have built-in clients.
- Router web interface access credentials (admin login/password, usually IP like 192.168.0.1 or 192.168.1.1).
Backups and Saving Settings
- Take photos or note your current network settings: SSID, Wi-Fi password, router IP, DHCP range, static IP bindings.
- If you plan to change your Nintendo Account region, make sure your wallet balance is zero and no active subscriptions exist—otherwise, you can’t change the region.
⚠️ Note: Before switching your store region, check your account balance and bonuses. Remaining funds might become inaccessible and prices or taxes may change depending on the country. Proceed consciously.
Basic Concepts
The clearer your foundation, the easier achieving predictable results will be.
- VPN Client — software on your router or PC that connects to a VPN server and encrypts your traffic. The Switch 2 usually doesn’t have a built-in VPN client, so the router or PC acts as a “bridge.”
- WireGuard — a modern VPN protocol, fast and easy to set up. Usually offers minimal latency and solid speeds.
- OpenVPN — a tried-and-true protocol widely supported across devices and routers but potentially slower than WireGuard.
- Policy-Based Routing (PBR) — selective routing, directing only your Switch 2’s traffic through the VPN while other devices use the regular connection.
- NAT Type — address translation type affecting how easily peer-to-peer connections form in games. For Nintendo, avoiding strict NAT restrictions is key.
Tip: If your router lets you pick a protocol, start with WireGuard. It’s simpler and faster, especially on home routers with modest processors.
Step 1: Update Your Switch 2 and Set Up Your Nintendo Account
Goal
Prepare your console and account: latest firmware, correct region, no region-reset blocks, and readiness for online services.
Detailed Instructions
- Turn on your Switch 2 and open System Settings (gear icon on the home screen).
- Go to System → System Update. Press Update and wait for completion; the console may restart.
- Return to System Settings → Internet. Note the console’s MAC address shown there. Take a photo—it’s handy for setting a static IP.
- Go to Users and ensure your profile is linked to your Nintendo Account. If not, select Link Nintendo Account and follow the on-screen login steps.
- Check your account’s region on a PC or phone by logging into Nintendo Account settings, looking under Country/Region of Residence. If changing region, make sure your balance is zero before proceeding, then update the region. Upon first login to eShop after changing, accept new terms.
- On your Switch 2, open Nintendo eShop, log into your account and wait for the catalog to load. This locks in your store’s region settings.
⚠️ Note: Frequent region switching to chase prices can trigger extra checks and payment mismatches. Use this function responsibly and don’t violate service terms.
Tip: If you travel often, keep your account region where you have a valid payment method; use a stable VPN connection to access other regions’ catalogs while on the move.
Expected Outcome
Your console is updated, your account linked, and your region clear. You see the eShop catalog and can log in error-free. Your console’s MAC address is recorded.
✅ Check: Launch eShop and verify currency and selections match your target region. If you changed the country, you’ll be prompted to accept new terms on first entry.
Common Issues and Fixes
- eShop won’t open: test your internet connection in System Settings → Internet → Test Connection.
- Region won’t change: clear your balance and cancel subscriptions, then try again.
- 2FA login errors: sync the time on your console and authenticator device.
Step 2: Choose Your VPN Connection Method for Switch 2
Goal
Pick the best option based on your gear and needs: router, Windows PC, or Mac.
Options and When to Use Them
- VPN on Router: best for a permanent home setup. Supports WireGuard/OpenVPN, stable, and allows PBR. Ideal if you have a modern router and want your console to connect like any other Wi-Fi device.
- VPN via Windows 10/11: handy if your router lacks VPN or you don’t want to change its config. Your PC acts as a gateway, sharing VPN internet over Wi-Fi or Ethernet.
- VPN via macOS: similar to Windows but uses Internet Sharing. Best if you have a Mac with strong Wi-Fi and can keep it on during gaming.
Tip: If you have a small portable router with OpenWrt/GL.iNet, use it as a pocket VPN node—it’s easy to set up, offloads VPN load, and won’t alter your main provider’s router.
Protocol Choices
- WireGuard: first choice for speed and simplicity.
- OpenVPN UDP: second option if WireGuard isn’t available.
- OpenVPN TCP or IKEv2: backups for tricky networks with blocks.
✅ Check: You’ve picked a method (router/Windows/Mac) and protocol (preferably WireGuard) and have the appropriate config file or connection details.
Step 3: Set Up VPN on Your Home Router (WireGuard/OpenVPN)
Goal
Create the VPN tunnel on your router and route your Switch 2’s traffic through it as needed.
Preparation: Reserve a Static IP for Your Console
- Locate your console’s MAC address (noted in Step 1).
- Log into your router’s web interface (e.g., http://192.168.1.1) as admin.
- Go to LAN/DHCP and add a static binding: console MAC → fixed IP, for example 192.168.1.50.
- Save changes and restart your console and router if needed.
Tip: Assigning a static IP simplifies PBR or device filtering and helps monitor traffic statistics specifically for your console.
Option A: AsusWRT/Merlin — WireGuard
- Access VPN or WireGuard section in router interface.
- Click Add Tunnel or Import, select your WireGuard .conf file.
- Check keys, addresses, and DNS auto-populated correctly. Set MTU to default (usually 1420–1440) or as your provider recommends.
- Save the profile and activate the tunnel (Switch On/Activate). Wait for status Connected/Handshake.
- Open device routing section (On Asus, VPN Director or VPN Fusion). Add a rule: device = your console’s IP (192.168.1.50) → use tunnel WG1.
- Apply settings and restart VPN service if needed.
Option B: AsusWRT/Merlin — OpenVPN
- Go to VPN → VPN Client → Add Profile.
- Choose OpenVPN and Import the .ovpn file.
- Enter Username/Password from your provider if requested.
- Save and Activate. Wait for Connected status.
- Enable VPN Fusion or VPN Director and add rule to send the console IP traffic (192.168.1.50) through OVPN1 profile.
Option C: Keenetic (WireGuard/OpenVPN)
- Log into the web interface. Navigate to Internet → Other connections or VPN.
- Add a WireGuard profile: import .conf or enter keys and addresses manually. For OpenVPN, import .ovpn and credentials.
- Activate the connection and check status "Connected/Traffic active."
- Under Policy Profiles (routing), create a rule: source IP 192.168.1.50 → tunnel WG/OVPN.
- Save, apply, and restart VPN connection.
Option D: OpenWrt/GL.iNet
- Open LuCI or GL.iNet’s simple interface.
- Install wireguard-tools/luci-app-wireguard packages if needed.
- Create a WireGuard interface: import .conf, assign firewall zone and DNS. For OpenVPN: add profile and import .ovpn.
- Enable PBR package (such as luci-app-pbr) and add rule: IP 192.168.1.50 → WG interface.
- Save and restart network services.
Tip: Choose a VPN server closer to your location to reduce latency. If you plan to buy from a particular eShop region, pick a server in that country where payment is easy and legal.
⚠️ Caution: Changing DNS in the VPN profile might affect domain resolution for eShop and game servers. Use your VPN provider’s DNS or trusted public resolvers. Avoid untrustworthy DNS services.
Expected Outcome
Your router should have an active WireGuard or OpenVPN tunnel. The PBR rule forces your console’s IP traffic through VPN, while other devices remain unaffected.
✅ Check: Confirm VPN status on router interface is Connected/Handshake OK. Logs show IP 192.168.1.50 routed via VPN interface. Other devices use regular internet without VPN.
Issues and Fixes
- Tunnel won’t connect: verify keys, login info, router time, MTU, and provider blocks.
- No traffic through tunnel: check routes and firewall; ensure PBR rule for 192.168.1.50 is active.
- Speed drops significantly: try another server, use WireGuard, reduce MTU by 20–40, disable extra DPI filters.
Step 4: Precise Routing and Optimization (PBR, DNS, MTU)
Goal
Perfect your network setup: route only your Switch 2 through VPN, set proper DNS, and tweak MTU for stability.
Detailed Process
- Verify PBR: ensure only IP 192.168.1.50 is in the VPN routing table. On Asus: VPN Director; on Keenetic: Policy Profiles; on OpenWrt: luci-app-pbr.
- DNS: in VPN profile, use your VPN’s DNS or a reliable public DNS (e.g., from your provider). Enable "Force DNS through tunnel" if available to prevent leaks via your home ISP.
- MTU: start with default value. If you notice freezes, lower it by 20–40 and retest. The goal is no packet fragmentation and a consistently high success rate.
- Wi-Fi: for the console’s access point, enable 5 GHz, channel width 40–80 MHz, and pick a less crowded channel. Disable aggressive optimizations like excessive QoS that might increase latency.
Tip: If your home uses 2.4 GHz for smart devices, set up a separate 5 GHz SSID just for gaming. This reduces interference and speed drops.
Expected Result
Your Switch 2 exclusively routes through VPN, DNS queries don’t leak outside, Wi-Fi stays stable, and packets don’t fragment.
✅ Check: On the console, go to System Settings → Internet → Test Connection. Review download/upload speeds and NAT Type. Repeat tests on various 5 GHz channels to find the best one.
Problems and Solutions
- Intermittent eShop access: check DNS and MTU. Try an alternate VPN provider’s DNS.
- Latency spikes at peak times: switch to a closer VPN server or use a backup profile. Consider wired connection for PC/router.
Step 5: Set Up VPN on Windows 10/11 (Wi-Fi/Ethernet Sharing)
Goal
Run a VPN client on your PC and share the secure connection with your Switch 2 via hotspot or Ethernet.
Preparation: Install VPN Client
- Install WireGuard for Windows or OpenVPN GUI and follow the setup wizard.
- Import config: WireGuard → Import tunnel from file → select .conf; OpenVPN GUI → place .ovpn in config folder and connect from system tray.
- Connect to VPN; confirm Active/Connected status. Note your VPN network adapter’s name (e.g., WireGuard Tunnel).
Sharing Over Ethernet (Recommended for Stability)
- Connect your PC to the internet (preferably wired), and connect Switch 2 to PC via USB-LAN adapter or Ethernet dock.
- Open Control Panel → Network and Sharing Center → Change adapter settings.
- Right-click the VPN adapter (WireGuard), open Properties → Sharing tab.
- Check "Allow other network users to connect through this computer’s internet connection" and pick the Ethernet adapter linked to Switch 2 under "Home networking connection."
- Press OK. Windows will create a gateway and assign an IP to your console.
Sharing Over Wi-Fi Hotspot
- Go to Settings → Network & Internet → Mobile hotspot.
- Set network name and password. Turn on Mobile hotspot.
- Return to Network and Sharing Center → Change adapter settings.
- Right-click VPN adapter → Properties → Sharing → enable sharing and select the "Wireless Network (Mobile Hotspot)" virtual adapter.
- Confirm settings. Your hotspot now provides internet over VPN.
Tip: For low latency, keep PC connected via Ethernet to your router, and enable the hotspot for Switch 2 on 5 GHz. Use wired adapter for the console through the dock if possible.
Connecting Your Switch 2
- On Switch 2, open System Settings → Internet → Internet Settings.
- Select your PC’s hotspot SSID, enter the password, and connect.
- Run Test Connection to ensure traffic routes through the VPN.
Expected Outcome
Your PC is connected to the VPN and shares the internet with your Switch 2. The console passes connection tests and accesses eShop successfully.
✅ Check: While VPN is active on your PC, disable main internet on your router or change VPN server. Switch 2 should instantly reflect these changes (speed, ping), proving traffic is routed via your PC gateway.
Issues and Fixes
- Internet sharing not working: toggle ICS (Internet Connection Sharing) off and on, restart VPN client and the "Internet Connection Sharing (ICS)" service.
- Switch not getting IP: confirm correct adapter is selected in sharing settings.
- Low speed: use 5 GHz Wi-Fi, move PC closer to console, check channel congestion.
Step 6: Set Up VPN on macOS (Internet Sharing)
Goal
Enable VPN on your Mac and share that connection over Wi-Fi to your Switch 2 using Internet Sharing.
Detailed Steps
- Install WireGuard for macOS or another client if needed. Import .conf or .ovpn and connect.
- Go to System Settings → General → Sharing.
- Choose Internet Sharing. Under "Share your connection from," select the VPN interface (e.g., WireGuard).
- Check "To computers using," select Wi-Fi.
- Click "Details" next to Internet Sharing to set network name, channel, and password. Use 5 GHz and WPA2/WPA3 if available.
- Turn on Internet Sharing and confirm prompts.
- On Switch 2, connect to the Wi-Fi network your Mac created and run Test Connection.
Tip: Keep your Mac connected to the internet via Ethernet to reduce Wi-Fi load and lower latency for your console.
Expected Result
Your Mac acts as a hotspot. Your Switch 2 connects to it and routes all traffic through the VPN tunnel.
✅ Check: Change VPN server on your Mac’s client. Switch 2’s speed and latency should update accordingly during connection tests.
Issues and Fixes
- No Internet Sharing option: check your macOS version and use system search; some versions relocate settings but keep the same logic.
- Switch can’t see the network: try changing Wi-Fi channel, reducing channel width, and moving the Mac away from interference.
- Dropouts: ensure your VPN connection is stable and your Mac doesn’t go to sleep.
Step 7: Connect Switch 2 to Network and Verify NAT Properly
Goal
Make sure your console works well online, the eShop loads correctly, and NAT type is good for gaming and co-op.
Step-by-Step
- On Switch 2, open System Settings → Internet → Internet Settings → select your network.
- Press Test Connection and wait for results: download/upload speeds, NAT type, UPnP status.
- If NAT is too restrictive (like Type D), try a different VPN server, restart router, and check MTU and DNS settings.
- Ensure you can access eShop and download demos or updates, watching for authorization errors.
Tip: For co-op games, pick VPN servers closer to game servers or your friends. Sometimes a slightly farther server gives a more stable route to the data center than a geographically nearest one.
Expected Result
Your console stays reliably connected to the internet, eShop works smoothly, and NAT type isn’t blocking gameplay (B or C types usually work fine).
✅ Check: Launch an online game you had issues with before. Stable matchmaking and no persistent connection errors indicate correct settings.
Step 8: Regional Details for eShop and Payments
Goal
Manage your eShop catalog and purchases correctly when changing regions or using VPN to avoid unexpected restrictions.
Instructions
- Understand regional ties: eShop uses your Nintendo Account region, not your console’s location. VPN helps when traveling and facing network blocks.
- If changing account region, confirm zero balance and no active subscriptions. After switching, open eShop on the console and accept new terms.
- Payments: different countries accept different cards and methods. Use a payment method compatible with your account’s country for reliability.
- Codes and gift cards: useful if you don’t want to add a card. Make sure the card matches the region.
- Taxes and prices vary by region—plan your purchases accordingly.
Tip: If you deal with multiple regions, create separate Nintendo accounts per country and switch users on your console. This helps avoid confusion with balances and taxes.
Expected Outcome
You handle purchases securely, understand how region affects your account, and avoid losing funds when switching.
✅ Check: Log into eShop with the intended account, verify currency and prices, and successfully download a free demo. No errors should occur.
Step 9: Recommendations for Choosing a VPN Provider and Configs
Goal
Pick a practical provider that simplifies setup on routers and PCs, offers stable routing for your Switch 2, and improves NAT behavior.
vpn.how provides personal VPN servers with dedicated IP addresses. Available locations, protocols and current prices are shown on the website and in your account. Payment methods and the final amount are displayed at checkout. Choose a server
Tip: Start with the WireGuard config from your personal account. Keep an OpenVPN UDP profile handy as a backup in case of network filtering.
✅ Check: Download your config, import it on your router or PC, connect the tunnel, and run a Switch 2 Test Connection. Stable speeds and acceptable NAT Type confirm proper setup.
Verifying the Result
Checklist of What Should Work
- Your console connects to your network and passes System Settings → Internet → Test Connection.
- The eShop catalog opens with correct currency and prices, no login errors.
- NAT Type doesn’t block online games; matchmaking works reliably.
- Changing VPN servers adjusts speed and ping on the console as expected.
- Only Switch 2’s traffic goes through VPN (if PBR is enabled); all other devices function normally.
How to Test
- Run 3–5 Test Connection attempts at different times of day.
- Play 1–2 online games with matchmaking, completing 2–3 sessions each.
- Download demos or updates and compare speeds on various VPN servers.
Success Indicators
- Stable connection tests with no disconnects.
- Predictable ping without spikes.
- Games join lobbies without frequent errors.
Common Issues and Fixes
- Issue: eShop won’t open.
Cause: DNS or MTU conflicts.
Fix: Switch DNS to provider’s recommended servers, lower MTU by 20–40, restart tunnel and console. - Issue: NAT Type too strict.
Cause: Shared IP or aggressive NAT on provider side.
Fix: Use a personal IP from your VPN provider, switch to WireGuard protocol, try different servers, check PBR and UPnP on router. - Issue: Slow VPN speeds.
Cause: Crowded nodes, weak Wi-Fi, router CPU handling encryption.
Fix: Pick a closer server, use 5 GHz Wi-Fi, wired connection if possible, switch to WireGuard. - Issue: Switch loses connection.
Cause: PC/Mac hotspot sleeps or VPN reconnects.
Fix: Disable sleep mode on PC/Mac, enable auto-reconnect in VPN client, update Wi-Fi drivers. - Issue: Cannot change account region.
Cause: Non-zero balance or active subscriptions.
Fix: Clear balance, cancel subscriptions, wait for billing period to end, then change region and open eShop to lock terms. - Issue: Console doesn't get IP via ICS.
Cause: Wrong adapter selected in sharing settings.
Fix: Disable sharing, pick the correct adapter (Ethernet or Mobile Hotspot), enable sharing again. - Issue: Slow matchmaking.
Cause: Poor route to data center.
Fix: Switch to a nearby server in another city/country, test ping at different times, pick the best.
Additional Features
Advanced Settings
- Split domain routing: route only gaming domains through VPN, rest go direct. This requires domain lists and router support—more complex setup.
- Dual WAN and failover: if your router supports a second channel, configure automatic failover to avoid disconnecting mid-game.
- QoS for gaming: prioritize console traffic moderately; don’t overdo it to avoid choking other traffic.
Optimization
- Local update cache on PC: doesn’t speed Switch directly but reduces bandwidth if multiple consoles share internet.
- Hybrid setup: router with VPN for stable gaming plus PC gateway as backup for failures.
Tip: Keep a test log: note server, time, speed, ping, and NAT Type. After a week, you’ll have a clear map of the best times and places to game.
Extra Ideas
- Create a separate VLAN or guest network for gaming devices with simpler rules and minimal filters.
- Automate VPN server switching on your router via scripts (advanced users).
FAQ
Q: Does Switch 2 have a built-in VPN client?
A: Generally no. The reliable method is VPN on router or through PC/Mac sharing.
Q: Which protocol should I try first?
A: WireGuard for speed and simplicity. If it won’t work, try OpenVPN UDP.
Q: Can VPN improve my NAT Type?
A: Yes, if your VPN provider offers a dedicated IP and stable routing. No guarantees, but often better than ISP CGNAT.
Q: Do I have to change my account region to access a different catalog?
A: Not necessarily. The catalog depends on account region. VPN is mainly for stable networking and travel.
Q: FPS dropped after VPN setup.
A: FPS isn’t affected by VPN, but latency can impact your experience. Choose nearby servers, 5 GHz or wired, and reduce MTU.
Q: Do I need to open router ports?
A: Not for the console if VPN is stable. UPnP can help but use cautiously.
Q: Can I use a smartphone as a VPN hotspot?
A: If your phone routes VPN over tethering, yes. It depends on device and OS. Routers or PC/Mac are easier and more stable.
Q: What if my download speeds fluctuate?
A: Switch VPN servers, test outside peak hours, check Wi-Fi quality and distance to router.
Q: Can I route games via VPN but access eShop directly?
A: Yes, with PBR and domain/IP lists, but setup is advanced. Easier to route all traffic via VPN for predictability.
Q: Is it safe to keep VPN configs on router?
A: Yes, if your admin password is strong, remote access is disabled, and firmware is updated.
Conclusion
You’ve completed the full journey: prepared your Switch 2 and Nintendo Account, chosen the right VPN setup, configured tunnels on router or PC/Mac, optimized routing, DNS, and MTU, and verified everything with eShop and online games. Your traffic now flows predictably, and matchmaking and downloads are stable. For deeper configuration, use PBR, QoS, and separate gaming networks. Experiment with servers and protocols to find your best ping and stability balance. Keep regional rules, taxes, and payment methods in mind; plan your purchases and keep a backup VPN profile ready. With these skills, you confidently control your Switch 2’s network environment and enjoy your games without unexpected surprises.
Publisher: vpn.how