VPN for Apple Watch: How to Set It Up via iPhone Without Mistakes — Step-by-Step Guide
Learn how to configure a VPN so your Apple Watch uses a secure connection through your iPhone. In 60–90 minutes, you'll get a working setup for WireGuard, IKEv2, or OpenVPN, understand watchOS limitations, and discover how to test and troubleshoot common issues.
Content of the article
- Introduction
- Preparation
- Basic concepts
- Step 1: check the iphone and apple watch connection
- Step 2: choose protocol and prepare configs
- Step 3: set up vpn on iphone — wireguard
- Step 4: set up vpn on iphone — ikev2 via built-in tools
- Step 5: set up vpn on iphone — openvpn
- Step 6: auto-connect, scenarios, and control from the watch
- Result check
- Common issues and fixes
- Additional features
- Faq
- Conclusion
Introduction
In this step-by-step guide, you'll set up a VPN so that your Apple Watch’s internet traffic goes through your iPhone with an active VPN tunnel. We’ll explore what watchOS can and can’t do in 2026, which protocols actually work, how they differ, and how to ensure your watch uses a secure route. By the end, you'll have a solid setup, easy-to-follow tests, and solutions for common problems.
Who this guide is for: beginners using iPhone and Apple Watch who want to secure their watch’s connection, and advanced users interested in protocol nuances, automation, and fine-tuning. We’ll move from simple to complex with clear steps, tips, and checkpoints.
What you need to know beforehand: basic iPhone and Apple Watch operation, how to install apps from the App Store, and a general understanding of what a VPN is and why you need one. Technical concepts are explained simply, with extra advice for trickier parts.
Estimated time: basic setup takes 30–45 minutes; advanced setups with automation and multiple protocols take up to 60–90 minutes. Testing and debugging require 10–20 minutes depending on your network and provider.
Preparation
Before starting, make sure you have all the necessary devices, software, and access. Proper preparation saves time and prevents many potential errors.
Required devices and access
- An iPhone with up-to-date iOS (recommended iOS 17 or later; in 2026 usually iOS 18 or 19).
- Apple Watch running watchOS 10, 11, or newer. The iPhone and watch must be paired and working.
- Internet access via cellular or Wi‑Fi.
- Access to a VPN service or your own VPN server supporting WireGuard, IKEv2, or OpenVPN. L2TP and SSTP are possible via third-party clients but considered alternatives with limitations.
System requirements and specifics
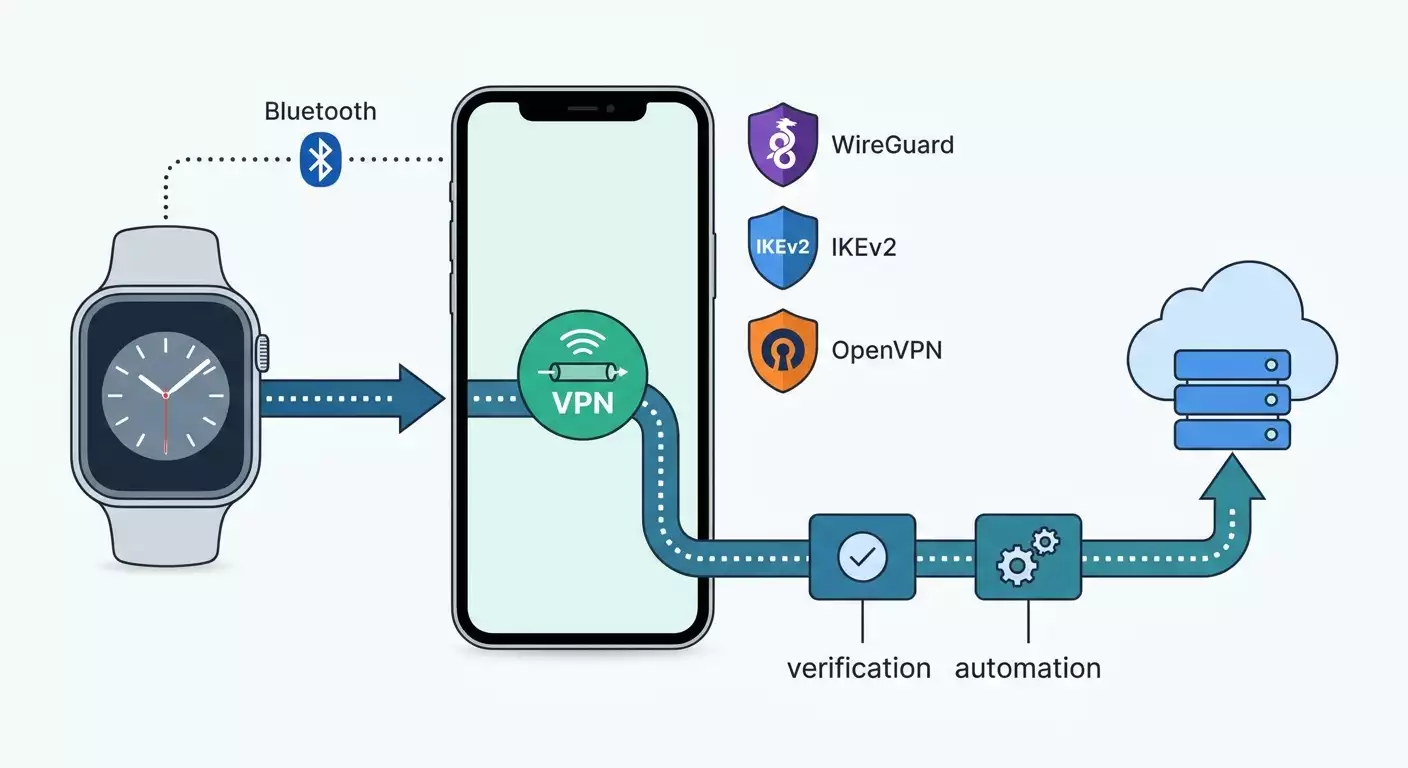
- Apple Watch has no dedicated VPN system setting. When connected to the iPhone via Bluetooth or the linked Wi‑Fi network, the watch uses the iPhone's VPN traffic. If the watch connects via its own Wi‑Fi or cellular, there’s no system VPN on the watch itself.
- The iPhone must be able to maintain a VPN connection in the background. Use apps that support persistent connection and the “Connect on Demand” option.
- For IKEv2, use built-in iOS tools; for WireGuard and OpenVPN, use official App Store clients.
What to download and install on iPhone
- WireGuard client (if planning to use WireGuard).
- OpenVPN client (if using OpenVPN).
- Profile or settings for IKEv2 (if using IKEv2). This can be a ready configuration file or server credentials.
- The Shortcuts app — preinstalled on modern iOS versions. Needed for testing on the watch.
Backups and precautions
Before making system changes, back up your iPhone. Apple Watch backups happen alongside iPhone backups. This lets you restore if anything goes wrong.
Tip: If you already have VPN apps configured, screenshot your current settings. It speeds up restoring the original state.
⚠️ Warning: If installing an IKEv2 profile with a custom certificate, make sure you trust the certificate source and store files securely. Compromised certificates open the door to MITM attacks.
Basic concepts
To avoid confusion during setup, here’s a quick rundown of how Apple Watch connects to VPN and why there’s no separate VPN toggle on the watch.
How Apple Watch accesses the internet
- When your watch is near your iPhone and connected via Bluetooth (or via the linked Wi‑Fi network), it uses the iPhone as a gateway. The watch’s app traffic routes through the iPhone’s network stack and then out to the internet.
- If the watch connects to a known Wi‑Fi network independently, it uses its own networking stack and accesses the internet directly, bypassing the iPhone.
- Cellular Apple Watch models (eSIM) with active LTE also connect directly.
What this means for VPN
- If the watch uses the iPhone as a gateway and the iPhone has a VPN enabled with an “all traffic” policy, watch traffic also goes through that VPN.
- If the watch uses standalone Wi‑Fi or LTE, there's no system VPN on the watch, so traffic goes direct.
- Exceptions include special corporate setups with MDM and custom profiles; for home use, rely on the iPhone’s VPN.
Protocols and their characteristics
- WireGuard: Fast, modern, UDP-based. Maintains connection well, saves battery, and is easy to configure. Recommended by default.
- IKEv2/IPsec: Built into iOS, works well with “Connect on Demand,” and quickly restores the tunnel. Good if you don’t want extra apps.
- OpenVPN: Flexible and compatible; can run over UDP/TCP but usually more resource-intensive than WireGuard.
- L2TP and SSTP: Consider these backups. iOS is phasing out L2TP support; SSTP isn’t natively supported and requires third-party solutions.
Tip: If you often switch between networks (home, office, mobile), start with WireGuard. It drops connections less often and is battery-friendly.
⚠️ Warning: Some public networks block UDP traffic. In such cases, WireGuard or OpenVPN over UDP may fail. Try OpenVPN over TCP or IKEv2 for troubleshooting.
Step 1: Check the iPhone and Apple Watch connection
Goal
Make sure your watch is genuinely using the iPhone as a network gateway. This is crucial: without this link, watch traffic won’t go through the iPhone’s VPN.
Step-by-step
- Unlock your iPhone and Apple Watch. Confirm they’re paired and close to each other.
- On the Apple Watch, open Control Center by swiping up from the bottom of the watch face.
- Look at the iPhone connection indicator. A green phone icon means it’s connected.
- Tap the Wi‑Fi icon on the watch and turn it off if it's on. This forces the watch to use the iPhone connection.
- If you have an LTE Apple Watch, open Control Center and turn LTE off. Otherwise, the watch uses cellular directly.
- On iPhone, go to Settings and turn on Bluetooth. Make sure iPhone isn’t in Airplane Mode and is connected to the internet.
- In the watch’s Control Center, make sure the green iPhone connection icon appears at the top. If not, bring devices closer and wait a few seconds.
Key points
Important: We want the watch to act as a bridge through the iPhone. In this mode, all watch network traffic passes through the iPhone’s network stack. If Wi‑Fi or LTE is enabled on the watch, it accesses the network independently, bypassing the iPhone and its VPN.
Warning
⚠️ Note: If you disable Wi‑Fi and LTE on the watch, some features (large data transfers, app reinstalls) may slow down since they rely on the iPhone link.
Tips
Tip: Make it a habit: keep Wi‑Fi and LTE off on your watch when privacy matters, with an iPhone nearby running an active VPN.
Tip: If you often use the watch far from your iPhone, plan a separate strategy — for example, shift some tasks to the phone or only use trusted networks.
Expected result
The watch consistently shows the iPhone connection icon. Wi‑Fi and LTE are off on the watch. This ensures the Apple Watch traffic goes through the iPhone and its VPN.
Possible issues and fixes
- No iPhone connection icon: restart both devices, enable Bluetooth on both, and keep them close for 30–60 seconds.
- The watch turns Wi‑Fi on by itself: check if a familiar Wi‑Fi network is selected. Force disable Wi‑Fi in the watch’s Control Center.
- On LTE watches, cellular may persistently activate: manually turn off LTE in Control Center before sensitive sessions.
✅ Check: iPhone connection icon is active on the watch; Wi‑Fi and LTE on the watch are off. Ready for the next step.
Step 2: Choose protocol and prepare configs
Goal
Decide which VPN protocol to use on your iPhone and prepare configurations upfront to speed up switching and testing.
Step-by-step
- Assess your environment. If you encounter networks with UDP blocking, keep IKEv2 or OpenVPN over TCP ready. Otherwise, start with WireGuard.
- Gather configs: WireGuard requires a config file or QR code; OpenVPN needs an ovpn file and keys; IKEv2 requires server, remote ID, and authentication (username/password or certificate).
- Choose your DNS. It's best to use your VPN server's DNS or a trusted resolver to prevent DNS leaks.
- Plan your connection mode: always-on, on-demand, based on Wi‑Fi/cellular, or manual. This affects battery usage and watch traffic routing.
Expert recommendation
If you don't want to set up your own server from scratch, check out vpn.how. It offers personal VPN servers with dedicated IPs per client, supporting WireGuard, OpenVPN, IKEv2, plus L2TP and SSTP for different needs. Servers are located in Moscow, St. Petersburg, Amsterdam, Frankfurt, London, New York, San Jose, Chicago, Singapore, Sydney, Madrid, Helsinki, Stockholm, Warsaw, Copenhagen, and Stavanger. Payment options include Russian cards, SBP, and cryptocurrencies USDT or BTC. Pricing starts at 490 RUB per day or 2490 RUB per month, with discounts for longer terms. Servers deploy automatically within 5 minutes of payment, with no logs kept. You get ready-to-use config files for WireGuard, OpenVPN, and IKEv2 in your account — just download and import directly into your iPhone client without manual setup. This speeds up configuration and troubleshooting for our purposes.
Key points
- Pick the closest server geographically to minimize latency and extend watch battery life.
- If you want watch access to your home network via iPhone, add the home subnets to AllowedIPs in WireGuard and configure routes on your server accordingly.
Tip
Tip: Prepare two profiles right away: a primary WireGuard and a backup IKEv2. Switching between them on iPhone takes seconds and increases resilience to network blocking.
✅ Check: You have working configs for your chosen protocol, ready to import into the iPhone. Proceed to setup.
Step 3: Set up VPN on iPhone — WireGuard
Goal
Install and configure WireGuard properly on iPhone, enable background tunnel hold options, and verify watches route traffic through this VPN.
Step-by-step
- Install WireGuard app from the App Store on your iPhone.
- Open WireGuard and tap “Add Tunnel.”
- Choose import method: “Create from file or archive” if you have a file, or “Scan QR code” if your provider gave one.
- Import the configuration. Check Interface and Peer fields: private key, addresses, server’s public key, Endpoint, and AllowedIPs.
- If needed, add DNS servers to the Interface section to prevent DNS leaks.
- Save the tunnel and toggle it on via the switch next to its name.
- Allow the app to add a VPN profile in iOS when prompted.
- Open tunnel settings and enable “On-Demand” or “Connect on Demand” if available. In some app versions, this appears as enabling for Cellular, Wi‑Fi, and No Restrictions — turn on for networks where you want persistent connection.
- Ensure AllowedIPs is set to 0.0.0.0/0 and ::/0 if all traffic (including watch traffic) should go through VPN. For split routing, specify only needed subnets and domains using DNS resolution.
- Adjust MTU if you experience fragmentation issues — usually 1280–1380 helps unstable networks. Leave auto by default.
Important points
- For Apple Watch to work properly via iPhone, VPN must stay active on iPhone even with the locked screen. WireGuard maintains the tunnel well if On-Demand mode is enabled.
- If you have home devices on a local network, add their subnets to VPN exceptions or include them in routes, depending on your needs.
Tips
Tip: Add the WireGuard widget to your iPhone home screen and enable Control Center access via Shortcuts to avoid forgetting to turn the tunnel on.
Tip: If WireGuard won’t connect on public Wi‑Fi, temporarily switch to cellular or use a backup IKEv2 profile.
Expected result
The VPN icon appears in the iPhone status bar. WireGuard app shows the tunnel as active. In this state, all iPhone traffic and Apple Watch traffic (when connected to the iPhone) route through WireGuard.
Possible issues and fixes
- Tunnel connects then immediately disconnects: check keys and Endpoint; ensure UDP isn’t blocked. Try a different server port.
- iPhone has internet but watch doesn’t update: confirm watch is connected to iPhone, not its standalone Wi‑Fi or LTE.
- Notification delays: lower MTU or pick a nearby server.
✅ Check: Enable WireGuard on iPhone and open any internet-using app on the watch, like Weather. Then run the test in the “Result Check” section — the route should go through VPN.
Step 4: Set up VPN on iPhone — IKEv2 via built-in tools
Goal
Connect IKEv2 on iPhone without third-party apps, enable “Connect on Demand,” and prepare a profile for a stable background connection.
Step-by-step
- Open iPhone Settings and go to VPN.
- Tap “Add VPN Configuration” and select IKEv2.
- Enter server address, remote identifier (usually server domain), and local identifier if needed.
- Choose authentication method: username/password or certificate. Fill in the fields.
- Save the config and toggle “Status” on to connect. Allow adding the VPN profile if iOS asks.
- Go to config settings and enable “Connect on Demand.” In some iOS versions, this setting only is available via installed profiles. If you have one, install it via “VPN & Device Management.”
- If using a custom certificate, install and trust it on your iPhone via Settings → General → About → Certificate Trust Settings or Profiles during installation.
Important points
- Built-in IKEv2 reliably restores tunnels after network changes. This is crucial when moving between office, home, and outside with your watch and iPhone.
- If On-Demand options seem limited in iOS UI, ask your provider for a ready profile with connection rules.
Tips
Tip: For minimal latency, pick the nearest server. Keep certificates securely stored with Face ID off and never send them over open channels.
Tip: If occasional DNS leaks occur with IKEv2, set a custom DNS in iOS (Settings → Wi‑Fi → Network Info → DNS) or use a profile that forces DNS.
Expected result
The iPhone connects to IKEv2 and maintains the connection on demand. With an active tunnel, connected Apple Watches use the secure route.
Possible issues and fixes
- “Can't connect”: check remote ID and certificates. Verify UDP ports for IKEv2 are not blocked.
- Tunnel drops on screen lock: enable Connect on Demand or use a profile with Always-on rules.
- Slow speeds: change server or configure fragmentation on the IPsec server.
✅ Check: Turn on IKEv2 on iPhone, verify VPN status is active, and perform the watch connection test described later. The route should match your VPN’s IP.
Step 5: Set up VPN on iPhone — OpenVPN
Goal
Configure OpenVPN as an alternative protocol on iPhone for seamless background operation and failover during network restrictions.
Step-by-step
- Install OpenVPN app from the App Store on iPhone.
- Open the app and import the ovpn config file. Use “Open in OpenVPN” from Files or the Share menu.
- If required, import certificates and keys separately if not included in ovpn.
- Check server address, port, protocol (UDP or TCP), encryption settings, and DNS options.
- Enable options similar to “Seamless Tunnel” and “Reconnect on Demand” to keep connections alive (names may vary by app version).
- Save profile and connect. Allow iOS to add VPN profile when prompted.
Important points
- OpenVPN over UDP is usually faster, but if your network blocks UDP, use TCP on ports resembling allowed traffic (like those similar to HTTPS).
- Watch battery use can be higher with OpenVPN in complex networks compared to WireGuard.
Tips
Tip: Keep two OpenVPN profiles: one UDP, one TCP. Switch quickly if network issues arise.
Tip: Enable traffic kill-switch if your client supports it to prevent leaks during reconnects.
Expected result
OpenVPN connects successfully on iPhone and maintains a steady connection. Watches connected to the iPhone route traffic securely via OpenVPN.
Possible issues and fixes
- Frequent reconnects: switch to TCP temporarily or Reduce keep-alive interval.
- No local network access: add local subnets to exceptions or configure split-tunnel in your config.
✅ Check: Activate OpenVPN on iPhone and run the watch test in the “Result Check” section. The route should match your VPN.
Step 6: Auto-connect, scenarios, and control from the watch
Goal
Ensure VPN on iPhone automatically activates when needed and stays on while your watch needs protection.
Step-by-step
- In your VPN app, enable “Connect on Demand” for all networks you want VPN on. For WireGuard, enable On-Demand for Cellular and Wi‑Fi; for IKEv2, check the option in profile settings; for OpenVPN, activate auto-reconnect.
- Open Shortcuts on iPhone. Create an automation “When connecting to a specific Wi‑Fi,” adding “Open WireGuard” or “Run connect shortcut” actions if supported. This reminds and activates the tunnel when you join known networks.
- Create a time-based automation to turn VPN on during work hours if you don’t want it always on.
- On Apple Watch, add the “Wi‑Fi” button to Control Center and keep Wi‑Fi off when iPhone with active VPN is nearby. This ensures the watch doesn’t switch to standalone Wi‑Fi.
- If you have LTE-capable Apple Watch, manually turn LTE off when guaranteed routing through iPhone is needed, and turn it on for autonomous use.
Important points
- There’s no direct VPN toggle on Apple Watch. Control happens through iPhone behavior and VPN client policies.
- Personal automations in Shortcuts can run without confirmation if supported by your iOS version for chosen triggers.
Tips
Tip: Create “VPN ON” and “VPN OFF” shortcuts in Shortcuts and add them to iPhone’s home screen. This lets you enable the tunnel with two taps, and your watch will follow automatically.
Tip: Save several profiles for different cities if you travel. Watches are sensitive to latency: the closer the server, the faster app data loads.
Tip: If using Focus modes like Work or Travel, tie VPN activation to them via automation to avoid manual steps.
Expected result
VPN on iPhone activates automatically when expected and remains active in the background. The watch uses a secure route with no manual intervention when near the iPhone.
Possible issues and fixes
- Automations ask for confirmation: adjust trigger conditions or update iOS to a version allowing “Run Without Asking” for chosen events.
- The watch switches to Wi‑Fi: manually disable Wi‑Fi on the watch when guaranteed routing via iPhone VPN is required.
✅ Check: Leave iPhone locked with VPN active. Open 2–3 different network-based app cards on your watch. Everything should work smoothly and fast.
Result check
Checklist
- VPN (WireGuard, IKEv2, or OpenVPN) is turned on and stable on iPhone.
- Apple Watch is connected to iPhone, with Wi‑Fi and LTE off on the watch if you want guaranteed routing.
- Apps on the watch load data without errors.
- Basic automations or On-Demand are set up to keep the tunnel active.
How to test directly on the watch
- Open Shortcuts on iPhone and create a new shortcut named “My IP on Watch.”
- Add an action that fetches data via HTTP and displays the result. Use any public IP service returning your current IP as plain text. Choose “Text” format and add “Show Result” action.
- Enable “Show on Apple Watch” in shortcut properties so it can be run from the watch.
- Enable VPN on iPhone. Ensure the watch is connected to the phone and not using standalone Wi‑Fi or LTE.
- Run the “My IP on Watch” shortcut on Apple Watch and note the displayed IP.
- Turn off VPN on iPhone and run the shortcut again on the watch. The IP should change. This confirms the watch routes through the iPhone VPN.
Success indicators
- The watch’s IP with VPN on matches the IP seen by the iPhone.
- App cards on the watch load without noticeable delays.
- After switching Wi‑Fi or mobile networks, VPN quickly reconnects and the watch stays stable.
Tip: For reliability, repeat the test on different networks like a cafe and at home. This confirms your setup is robust.
Common issues and fixes
- Problem: Internet works on the watch but not via VPN. Cause: Watch is connected to standalone Wi‑Fi or LTE. Fix: Turn off Wi‑Fi and LTE on the watch and confirm it’s linked to iPhone running VPN.
- Problem: WireGuard on iPhone connects then disconnects immediately. Cause: UDP blocked or wrong keys. Fix: Check config, try a different port, or switch temporarily to IKEv2 or OpenVPN over TCP.
- Problem: IKEv2 connects but drops quickly. Cause: On-Demand mode missing or misconfigured. Fix: Enable On-Demand in profile or get one from your provider with Always-on rules.
- Problem: DNS leaks. Cause: VPN DNS not set on iPhone or in profile. Fix: Specify VPN DNS in WireGuard config or IKEv2 profile, or configure DNS manually in Wi‑Fi settings.
- Problem: Noticeable watch lag. Cause: Distant server or overloaded network. Fix: Switch to a closer server, lower MTU, use WireGuard.
- Problem: Apps on watch don’t update in the background. Cause: VPN on iPhone sleeps without On-Demand. Fix: Enable tunnel hold, set automations, disable data saver mode if it interferes.
- Problem: Multiple VPN clients conflict on iPhone. Cause: More than one active client overriding profiles. Fix: Keep only one VPN client enabled, disable others.
Additional features
Advanced settings
- Split-tunnel: In WireGuard, specify precise AllowedIPs to route only needed subnets or services via VPN. This reduces load and speeds up the watch.
- On-Demand policies: For IKEv2 profiles, set rules to always connect on cellular, disconnect on trusted Wi‑Fi, etc.
- IPv6: If your network and VPN support IPv6, include ::/0 in AllowedIPs to prevent IPv6 leaks.
- Obfuscation: Use server-side obfuscation or OpenVPN profiles that mimic allowed traffic for networks with DPI.
Battery optimization
- Choose a nearby server and fast protocol — WireGuard.
- Don’t leave LTE on the watch unless needed.
- Use On-Demand to avoid unnecessary tunnel reconnections.
Other possibilities
- Add a backup server and automate profile switching via Shortcuts.
- Set up home network access by IP whitelisting, so your watch can reach, for example, a media server at home through iPhone.
Tip: Keep a document with your profiles and brief instructions. When traveling, this saves time if you need to quickly reinstall configs.
FAQ
Q: Can I install VPN directly on Apple Watch without iPhone? A: Standard watchOS doesn’t have a separate VPN client or system VPN setting. The watch uses the iPhone’s VPN when connected, or connects directly if on standalone Wi‑Fi or LTE.
Q: Which protocol works best with Apple Watch? A: Start with WireGuard — it’s fast and power-efficient. Keep IKEv2 as backup. Use OpenVPN if UDP is blocked.
Q: Will notifications arrive if VPN is always on? A: Yes, if the tunnel is stable. Enable On-Demand, pick a nearby server, and lower MTU if delays occur.
Q: How can I confirm my watch traffic goes through VPN? A: Create a shortcut in Shortcuts that fetches your IP and run it on the watch. Compare IP addresses with VPN on and off on iPhone.
Q: What if VPN won’t connect in a cafe? A: Public networks often block UDP. Switch to OpenVPN TCP or IKEv2, or use cellular data to start the tunnel.
Q: Can VPN auto-start when launching certain apps on the watch? A: There’s no per-app VPN on the watch. Use On-Demand and Shortcuts automations based on Wi‑Fi, time, or Focus mode.
Q: Does constant VPN use drain watch battery? A: Minimal impact if using WireGuard and a nearby server. Network quality matters: fewer reconnects mean better battery life.
Q: Why does app data sometimes update slowly on VPN? A: Possibly high latency to the server. Switch to a closer server or fine-tune MTU. Make sure the watch uses the iPhone and not autonomous Wi‑Fi.
Q: Are SSTP or L2TP viable for this setup? A: They’re possible via third-party clients and server configs, but due to iOS limits and declining L2TP support, consider them backup options.
Q: What happens if iPhone sleeps and unloads the VPN client? A: Properly set On-Demand maintains connection. If it still unloads, update your client, reduce aggressive power saving, and use lighter protocols like WireGuard.
Conclusion
You’ve set up a working configuration where your Apple Watch uses VPN by routing traffic through your iPhone. We covered watchOS limitations, protocol selection, configuration prep, and setting up WireGuard, IKEv2, and OpenVPN on iPhone. You enabled tunnel-holding and automations, plus learned how to test directly from the watch. Now you understand how it works, what affects stability, and how to quickly fix issues.
Next steps: refine automations for convenience — for example, activate VPN with your Work Focus, keep 2–3 nearby servers under different profiles, and use On-Demand modes to avoid manual switching. For advanced setups, explore split-tunnel, home network access, and backup profiles for challenging networks. Remember this simple rule: when privacy matters on your watch, keep it connected to an iPhone with active VPN and turn off autonomous Wi‑Fi and LTE.
Tip: Every few weeks, run the quick test from the “Result Check” section. It takes just a couple of minutes and ensures your watches still use the secure route.