VPN on Router for PS5 and Xbox: Step-by-Step Guide for Mikrotik and Keenetic
Learn how to set up VPN on Mikrotik and Keenetic routers for your PS5 and Xbox—from choosing the server and protocol to routing only console traffic. Step-by-step instructions, result verification, ping optimization, and NAT setup in just 60–90 minutes.
Content of the article
- Introduction
- Preparation
- Basic concepts
- Step 1: choose protocol and server region, prepare access info
- Step 2: setting up wireguard on mikrotik (routeros 7)
- Step 3: setting up wireguard on keenetic
- Step 4: routing only console traffic on mikrotik (pbr)
- Step 5: routing only console traffic on keenetic
- Step 6: ping, nat, and stability optimization (mtu, upnp, qos)
- Results verification
- Common mistakes and fixes
- Additional features
- Faq
- Conclusion
Introduction
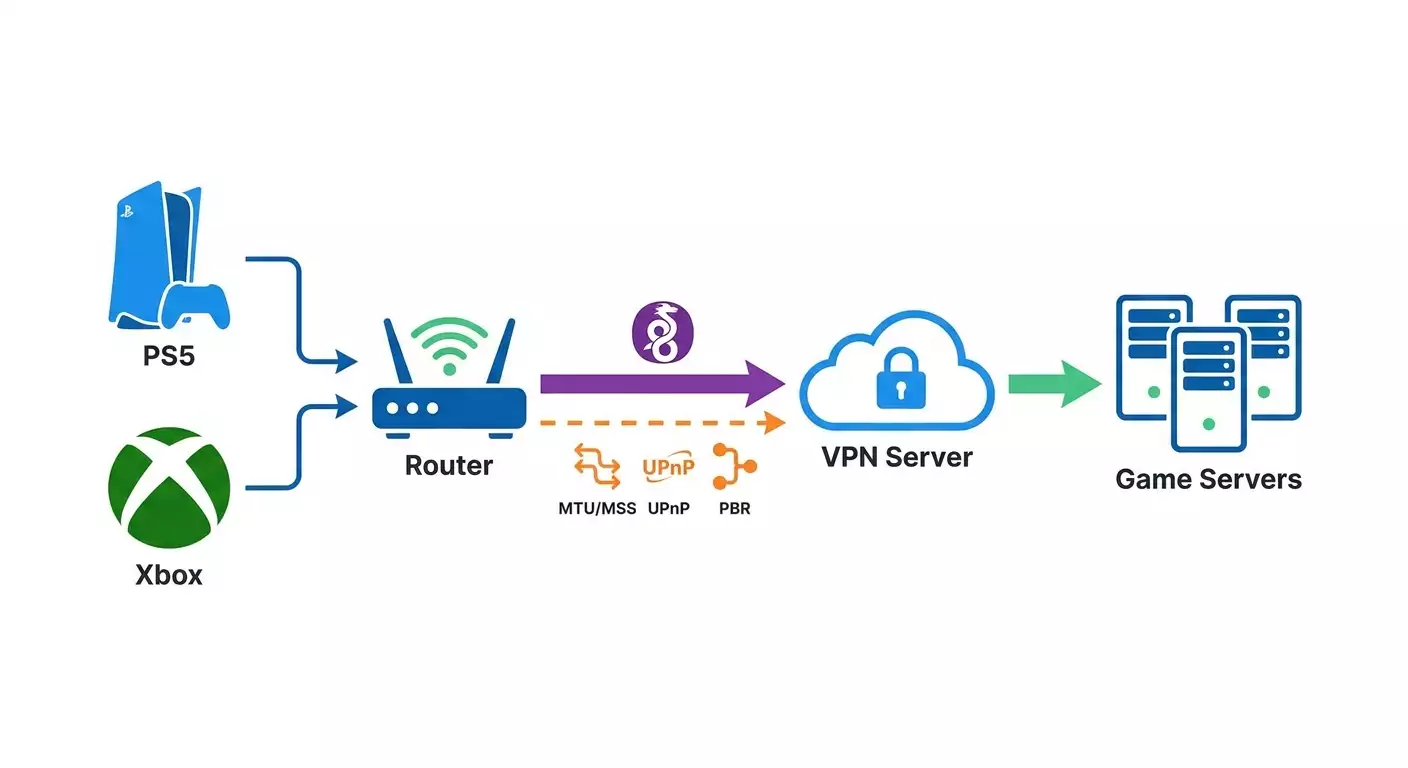
In this step-by-step guide, you’ll configure a VPN on your router for your PS5 or Xbox to achieve a stable connection, consistent ping, and proper NAT settings. We'll walk you through detailed setup instructions on two popular platforms — Mikrotik (RouterOS 7) and Keenetic (NDMS 4) — and help you pick the best protocol and region to minimize latency. After completing all steps, you’ll have a working VPN connection on your router, routing only the console’s traffic through the VPN, with correctly set MTU and MSS parameters, UPnP enabled, and optimized rules to ensure the best possible online gaming experience.
This guide is beginner-friendly but also covers advanced topics like Policy-Based Routing (PBR), fine QoS tuning, and NAT specifics for consoles. Each step is broken down clearly: where to click, what to enter, and which options to choose. We also offer alternative paths: Mikrotik users can choose between WinBox or WebFig, while Keenetic users benefit from a user-friendly web interface. For experts, there’s a separate section on optimizations.
It helps to understand VPN basics beforehand, though it’s not required—we explain key terms in simple language in the basics section. Expect to spend 60 to 90 minutes. Taking your time and following our checklists carefully will prevent errors. Where risks exist, we’ll point them out and show you how to quickly roll back changes and restore your router’s original configuration.
By the end, you’ll have: a VPN set up on your router tailored for PS5/Xbox gaming, the best region selected, routing only your console’s traffic, NAT status verified, and a clear troubleshooting routine if issues arise. Plus, you’ll know how to switch servers or protocols yourself depending on the game and matchmaking region to get lower ping and greater stability.
Preparation
Before you begin, make sure you have everything you need and that your hardware and software meet basic requirements. This will help you avoid surprises mid-setup and speed up the overall process.
Required Tools and Access
- Admin access to your Mikrotik (RouterOS 7.x) or Keenetic (NDMS 4.x) router.
- A PC or laptop on the same network as your router, with any modern browser installed.
- For Mikrotik: WinBox or WebFig access. WinBox is more convenient for quick tweaks and config export.
- VPN server details: address, keys/certificates or login/password, and protocol type (WireGuard, IKEv2, OpenVPN, L2TP/IPsec, SSTP).
- Your console’s IP address (static or DHCP reservation). This is critical for routing.
System Requirements
- Mikrotik: RouterOS version 7.7 or higher is recommended (native WireGuard support). Make sure your router’s CPU can handle encrypting the chosen protocol.
- Keenetic: latest NDMS 4.x version. VPN client components (WireGuard, OpenVPN, IPsec) must be installed; we’ll show you how.
- PS5 with the latest firmware, or Xbox Series/One with the latest updates installed.
- A stable internet connection with minimal packet loss. If using PPPoE, pay attention to the MTU setting.
What to Download/Install/Set Up in Advance
- WinBox for Mikrotik (if you plan to use it). Save a shortcut on your desktop for quick access.
- VPN connection data. For WireGuard: public/private keys, server address, port, AllowedIPs. For OpenVPN: .ovpn profile. For IKEv2: authentication parameters and identity info.
- IP addressing plan: note your console’s current IP or set a DHCP reservation so it stays consistent.
Creating Backups
- On Mikrotik: open WinBox, go to Files, click Backup, name the file, and set a backup password. Also, export the config: open New Terminal and run /export file=pre_vpn_export. The export .rsc file appears in Files. Download both to your PC.
- On Keenetic: go to the web interface, System — Configuration — Backup. Save the config to your computer. This will let you quickly restore original settings if needed.
Tip: Name backups with the date and a brief description, e.g., pre_vpn_2026-05-26. This makes it easier to find the right file if you need to revert.
Basic Concepts
A quick overview to help you understand why we take each step and how it affects ping and connection stability.
- VPN — an encrypted tunnel between your router and a remote server. Your console’s traffic goes through this tunnel, which can change its internet path and matchmaking region.
- WireGuard — a modern, fast VPN protocol. Usually the best choice for gaming due to low latency, simple setup, and high performance.
- OpenVPN — flexible and widely compatible but heavier on resources. Suitable for existing profiles or special cases.
- IKEv2/IPsec — reliable and fast, often performs well on mobile devices. Routers with hardware acceleration deliver high speed and moderate latency.
- L2TP/IPsec — easy to configure but generally outperformed by WireGuard/IKEv2 in speed and stability under load.
- SSTP — VPN over TLS, useful for bypassing strict firewalls but usually less ideal for gaming.
- MTU/MSS — maximum packet size and TCP segment size. Lowering MTU and enabling MCP MSS Clamping helps prevent fragmentation, reducing lag and packet loss.
- UPnP — automatic port forwarding for apps. Crucial for consoles to achieve Open NAT.
- NAT types: PS5 uses Type 1/2/3, Xbox uses Open/Moderate/Strict. Aim for Type 2 (PS5) or Open (Xbox). VPN servers with dedicated IPs increase chances of proper NAT.
- Policy-Based Routing (PBR) — lets you route only your console’s traffic through VPN, leaving other home devices on direct internet.
⚠️ Warning: Some games and anti-cheat systems block shared VPN IPs with heavy traffic noise. Using a personal VPN server with a dedicated IP is generally safer and offers better ping and matchmaking stability.
Step 1: Choose Protocol and Server Region, Prepare Access Info
Goal
Pick the best VPN protocol, select a server region suited to your games, and gather all access data to set up your router quickly and without errors.
Step-by-Step
- Identify where your game servers are located. For European MMOs or shooters, typical hubs include Amsterdam, Frankfurt, London, Warsaw, Stockholm. North America: New York, Chicago, San Jose. Asia: Singapore. Australia: Sydney. If you mostly play on European servers, choose Frankfurt or Amsterdam for the lowest average round-trip time (RTT).
- Choose the protocol: for gaming, WireGuard is recommended. It offers the lowest latency and is easy to set up. If your router has a weak CPU but supports IPsec hardware acceleration, IKEv2/IPsec is an alternative. OpenVPN UDP is a good universal fallback but expect slightly higher ping.
- Verify your router supports the chosen protocol. Mikrotik RouterOS 7 natively supports WireGuard. Keenetic supports WireGuard, OpenVPN, and IPsec with the appropriate installed components.
- Clarify NAT setup: dedicated IPs on the VPN server side often are critical for Open NAT. This reduces port collisions and blocks. If your provider offers a personal server or dedicated IP, that’s a plus.
- Gather connection data: server address (FQDN or IP), port, authentication type, keys/certificates. For WireGuard, this includes Public/Private Key, Endpoint, and AllowedIPs (usually 0.0.0.0/0 for full routing or selective for PBR).
- Do a quick ping test from your PC to several candidate regions. Open a command prompt and ping addresses with similar distances. Pick the one with the most stable and lowest RTT. A 5–10 ms difference is noticeable in fast-paced shooters.
- Decide if you want all your home traffic to go through VPN or only your console’s traffic. We recommend PBR to route only the console’s traffic. This reduces VPN load and keeps regular internet access for other devices.
- Reserve a local IP for your console. On the router, create a DHCP binding: assign a fixed IP (e.g., 192.168.1.50) to your console’s MAC address so the routing rules stay consistent.
Tip: If you have two close ping options (e.g., Amsterdam and Frankfurt), consider route variability and number of hops. Shorter path with less jitter generally means more stable matchmaking.
In practice, Frankfurt or Amsterdam are often best for Europe due to many gaming datacenters and exchange points. In Russia, Moscow or St. Petersburg sometimes offer faster access for certain services, but if the game is EU-distributed, Frankfurt is usually better. For multiplayer with Scandinavian friends, pick Stockholm or Copenhagen. For US servers, test New York versus Chicago: east coast has lower latency to many servers, but Chicago often acts as a predictable central node for some games.
✅ Checkpoint: You have your region chosen, protocol selected, access data ready (keys or login info), and a fixed local IP for your console.
Common Issues and Fixes
- Not sure where your game’s servers are. Solution: check matchmaking region inside the game or rely on known hubs (Frankfurt, Amsterdam, London, Warsaw).
- Same ping to multiple cities. Solution: pick the city with less jitter and fewer packet losses over a longer ping test (1–2 minutes).
- Router doesn’t support chosen protocol. Solution: update firmware or use an alternative protocol; OpenVPN UDP is a last resort.
⚠️ Warning: Using mass shared VPNs with overlapping IPs risks Strict NAT and anti-cheat bans. Dedicated IPs provide higher stability and safety.
Expert tip: the vpn.how service offers personal VPN servers with dedicated IPs (not shared) supporting WireGuard, OpenVPN, IKEv2, L2TP, SSTP. Setup takes 5 minutes, with servers in Moscow, St. Petersburg, Amsterdam, Frankfurt, London, New York, San Jose, Chicago, Singapore, Sydney, Madrid, Helsinki, Stockholm, Warsaw, Copenhagen, Stavanger. Payment methods include Russian cards (Tinkoff, Ozon), SBP, and USDT/BTC. Plans start at 490 ₽ per day and 2490 ₽ per month, with discounts for long-term. For gaming, a personal IP is the most important factor—giving stable ping and avoiding mass anti-cheat bans unlike shared IPs.
Step 2: Setting Up WireGuard on Mikrotik (RouterOS 7)
Goal
Create and activate a WireGuard interface on Mikrotik, add a peer, set the route, and check the connection.
Step-by-Step
- Open WinBox and connect to your Mikrotik. Ensure RouterOS version 7.x is running (visible in window title or System — Packages). Update if needed via System — Packages — Check For Updates — Install. Reboot takes 2–3 minutes.
- Create a WireGuard interface. In WinBox, go to Interfaces — WireGuard tab, click + — WireGuard. Name it, e.g., wg-gaming. Set Listen Port (default 51820 or per your provider). Set MTU to 1420 to start.
- Generate keys if needed. If your provider gave a public key and needs your public key, click Generate Key (if available) or use their generator and paste your Private Key into the interface.
- Add a peer (remote side). In the WireGuard window, go to Peers tab — click +. Paste the server’s Public Key. For Endpoint, enter server IP/domain and port, e.g., vpn.example.com:51820. In Allowed Address (AllowedIPs), enter 0.0.0.0/0 if the tunnel is your default route for console traffic via PBR. Set Persistent Keepalive to 25 seconds for stability behind NAT.
- Assign the tunnel IP address. Go to IP — Addresses — +. Select the wg-gaming interface. Enter the address provided by your VPN provider, e.g., 10.6.0.2/32 (or /24 if subnet is required). Use exact info from your VPN provider.
- Create a route tagged for PBR. Go to IP — Routes — +. Set DST Address to 0.0.0.0/0. Select Gateway as the wg-gaming interface (or specific next hop address if needed). Set Routing Table or Routing Mark as to-wg. This sets up routing for the chosen mark.
- Confirm DNS is reachable. Under IP — DNS, set reliable resolvers like 1.1.1.1 and 8.8.8.8. If your PBR rules send DNS traffic over VPN, verify outbound access to these IPs on the server side.
- Check tunnel status. Go to Interfaces — WireGuard — select wg-gaming — Peers tab. Last Handshake should update every 20–30 seconds. If empty, recheck keys, Endpoint, and port accessibility.
Tip: If your provider lists AllowedIPs, replace 0.0.0.0/0 with those to control exactly what goes through the tunnel, reducing overhead.
✅ Checkpoint: Peers show an active Last Handshake, Rx/Tx counters increase when pinging remote IP from the router, and wg-gaming interface has an assigned address.
Important Notes
Keys & synchronization: Your router’s public key must be added on the server side; otherwise, handshakes won’t occur. MTU: start with 1420. If you notice fragmentation or instability, reduce it in 20-byte steps to as low as 1380.
Common Issues and Solutions
- No Last Handshake. Cause: wrong Endpoint/port or router public key missing on server. Fix: double-check address and port, sync keys with server admin.
- Handshake present but no traffic. Cause: incorrect AllowedIPs or missing route. Fix: set AllowedIPs to 0.0.0.0/0 for full route, and add correct route to routing table.
- Tunnel drops periodically. Cause: Provider NAT/CGNAT. Fix: increase Persistent Keepalive to 25–30 seconds, ensure port isn’t blocked.
Step 3: Setting Up WireGuard on Keenetic
Goal
Install WireGuard component, create a connection, enter keys and parameters, and activate the tunnel.
Step-by-Step
- Log into Keenetic’s web interface and enter admin password. Confirm your device runs the latest NDMS 4.x: System — Update. Update if needed. Reboot takes 2–3 minutes.
- Install the WireGuard component. Go to System — Components. Find “WireGuard VPN” and install it. Wait for installation and reboot if prompted.
- Navigate to Internet — Connections — Add connection. Select type “WireGuard.” Name it, e.g., wg-gaming.
- Paste the Private Key provided by your VPN provider, or generate locally if available in the router UI. Enter the server Public Key and Endpoint (address and port), e.g., fr1.example.com:51820.
- In Allowed IPs, enter 0.0.0.0/0 if you want the tunnel to handle all traffic for the device via PBR. If your provider gives a specific subnet, enter that. Enable "Send all traffic through this VPN" only if you plan to route all home traffic through the tunnel; usually it's left off and routing is done per device.
- Enter the WireGuard interface IP address assigned by your provider, e.g., 10.6.0.3/32. Save settings and enable the connection.
- Check status. The connection card should show "Connected," and data counters increase with traffic.
Tip: Keenetic makes it easy to keep multiple VPN connections (e.g., Amsterdam and Frankfurt) and quickly switch via priority or device routing rules.
✅ Checkpoint: The Internet — Connections section shows wg-gaming as "Connected." Traffic counters rise when loading web pages on your PC by temporarily enabling "Send all traffic through this connection."
Common Issues and Solutions
- Connection fails to establish. Cause: incorrect keys or Endpoint. Fix: verify key pairs and make sure the router’s public key is added on the VPN server.
- Intermittent disconnects. Cause: unstable channel or CGNAT. Fix: set Keepalive to 25–30 seconds in advanced settings, adjust MTU.
Step 4: Routing Only Console Traffic on Mikrotik (PBR)
Goal
Configure routing so only your PS5/Xbox console uses the VPN, while other devices access the internet directly. This reduces VPN load and simplifies troubleshooting.
Step-by-Step
- Make sure your console has a static IP on your LAN. Go to IP — DHCP Server — Leases, find your console’s MAC, and create a Static lease with IP like 192.168.1.50. Click Apply.
- Create a mangle rule to mark routing. Go to IP — Firewall — Mangle, click +. Chain: prerouting. Src. Address: 192.168.1.50. Action: mark routing. New Routing Mark: to-wg. Check Passthrough if needed. Apply.
- Check mangle rules order. Ensure this rule is higher than general rules so the mark applies before exceptions. Move it up if necessary.
- Make sure IP — Routes contains a 0.0.0.0/0 route with Routing Table/Mark to-wg and Gateway set to wg-gaming. If missing, create it (see step 2). This connects the routing mark and route.
- Set DNS for your console. Under IP — DHCP Server — Networks, enter DNS addresses like 1.1.1.1 and 8.8.8.8 or your VPN provider’s DNS. This prevents resolution issues with matchmaking.
- Enable Clamp TCP MSS. Go to IP — Firewall — Mangle — +. Chain: forward. Protocol: tcp. TCP Flags: syn. Out. Interface: wg-gaming. Action: change MSS. New MSS: clamp-to-pmtu. This reduces fragmentation risk.
- Save configuration. Go to Files — Backup and create a fresh backup after applying these rules.
Tip: If you use multiple VLANs or subnets, create separate mangle rules for each console or segment to control traffic more precisely.
✅ Checkpoint: From your PC, ping any address and verify traffic goes direct. From the console, run a network test. The external IP should match your VPN server’s IP. On Mikrotik, IP — Firewall — Connections shows console traffic routed via wg-gaming.
Common Issues and Solutions
- Console can’t access the internet. Cause: missing DNS or faulty route. Fix: set DNS in DHCP Network and verify route with to-wg mark exists.
- Some services won’t load. Cause: incorrect MTU. Fix: enable Clamp MSS and lower WireGuard MTU to 1400–1380.
- All devices use VPN. Cause: default route without mark. Fix: review routing tables and mangle rules to correct marks.
Step 5: Routing Only Console Traffic on Keenetic
Goal
Set rules in Keenetic so only selected devices use the VPN while others connect normally.
Step-by-Step
- Assign a fixed IP to your console. In Home Network — Devices, find your PS5/Xbox, open its card. Enable “Permanent IP address” and set, e.g., 192.168.1.50.
- Go to Internet — Rules and Priorities (or Internet — Connections — Access Rules). Create a new routing rule. Set your console as the source device.
- Choose your WireGuard profile (wg-gaming) as the internet connection for this rule. Save and move this rule above general ones if prioritization is needed.
- Make sure the "Send all traffic through this connection" toggle is off in the WireGuard card if you don't want all your home traffic going through VPN.
- Assign DNS for the console device. If supported by your firmware, you can specify DNS servers in the device’s settings; otherwise, set global DNS in Internet — IP Settings (1.1.1.1 and 8.8.8.8) and verify routing rules cover DNS traffic for your console.
- Enable Clamp MSS. In your WireGuard internet connection, under Advanced settings, enable "MSS Correction" if available. This prevents fragmentation.
Tip: Keenetic makes it easy to create multiple rules for different consoles and toggle them on/off quickly. For example, PS5 through Frankfurt, Xbox through Amsterdam.
✅ Checkpoint: WireGuard connection stats show increased traffic when your console runs a network test. The console’s external IP matches the VPN server IP.
Common Issues and Solutions
- Rule doesn’t work. Cause: lower priority than general rules. Fix: drag the console’s rule higher in the list.
- Some PlayStation Network or Xbox Live services fail. Cause: MTU issues. Fix: enable MSS Clamping and reduce MTU to 1400–1380.
Step 6: Ping, NAT, and Stability Optimization (MTU, UPnP, QoS)
Goal
Achieve the highest connection stability and proper NAT type over VPN.
Step-by-Step
- Confirm the VPN server’s NAT policy. For Open NAT, a dedicated IP without CGNAT is preferred. Renting a personal server lets you finely tune port forwarding if needed.
- Enable UPnP on your router. On Mikrotik: go to IP — UPnP, enable it, set WAN interface as External and LAN as Internal. On Keenetic: go to Security — UPnP and enable “Allow UPnP for home devices.” Save.
- Check your console’s NAT type: on PS5 go to Settings — Network — Test Internet Connection; on Xbox go to Settings — Network — Network Settings and NAT check. Aim for Type 2 (PS5) or Open (Xbox). If Moderate/Strict, keep optimizing.
- Adjust MTU. Start at 1420 for WireGuard. If in-console tests show instability or connection freezes in games, lower MTU in 20-byte steps (1400, 1380, sometimes 1360). Set this on Mikrotik wg-gaming interface; on Keenetic, use WireGuard advanced settings or enable MSS Clamping.
- Enable QoS/prioritize gaming traffic. On Mikrotik: mark console traffic in IP — Firewall — Mangle by src-address and protocol/ports, then create a high-priority queue in Queue Tree. On Keenetic: Home Network — Priorities — set high priority for your console. This reduces latency during peak household bandwidth use.
- Check packet loss and jitter. Run a long ping (60–120s) from your PC to a VPN server node (e.g., gateway). Jitter should be low (few milliseconds), loss zero or very rare.
- Fine-tune ports (optional). If you have a personal server, you can set up DNAT rules to forward needed UDP/TCP ports through the tunnel to your console. This is an advanced setup requiring server access skills.
Tip: If someone streams or torrents at home, limit their bandwidth or assign low priority. Gaming traffic is sensitive to latency, not bandwidth.
✅ Checkpoint: Console shows NAT Type 2 (PS5) or Open (Xbox). Ping is stable, no spikes of tens of milliseconds. Games connect quickly to matches, and voice chat is smooth.
Common Issues and Solutions
- NAT stays Strict/Type 3. Cause: shared IP from VPN provider or no port forwarding. Fix: use a dedicated IP or switch to a region with better network policies.
- Voice chat is crackly or drops. Cause: household bandwidth overload. Fix: enable QoS, prioritize console, limit background devices.
- High ping in some games. Cause: matchmaking selected wrong region. Fix: change VPN region closer to game servers or restart matchmaking to refresh routes.
⚠️ Warning: Some games lock onto a region at launch. If you switch VPN regions, restart the game or console to recalibrate matchmaking servers.
Results Verification
Checklist
- VPN tunnel is active and stable (Handshake/Connected visible).
- Device-based routing works: only console traffic uses VPN.
- UPnP is enabled and doesn’t conflict with firewall rules.
- MTU/MSS configured correctly: no connection freezes or stalls.
- Console NAT is Type 2 (PS5) or Open (Xbox); voice chat is stable.
- Game ping is steady, jitter low, packet loss minimal or none.
How to Test
- Run the console’s built-in network test. Note ping and NAT type.
- Launch your favorite game and test matchmaking in your chosen region. Check in-game ping HUD if available.
- From your PC, concurrently ping the VPN server node to monitor tunnel stability.
- Try voice chat with a friend. Absence of delays or distortion is a good sign.
Success Indicators
- Ping matches expected values for your selected region (e.g., 25–45 ms for Frankfurt on good backbones).
- NAT type is correct, matches connect fast.
- Voice chat is smooth without stutters.
- Router CPU stays under 80% during gaming sessions.
Common Mistakes and Fixes
- Problem: VPN fails to connect. Cause: wrong keys, port, or Endpoint. Fix: double-check Public/Private Key pairs, sync keys with server, confirm port is open and no domain typos.
- Problem: Console has internet but games don’t find matches. Cause: incorrect MTU or fragmentation. Fix: enable MSS Clamping, reduce tunnel MTU from 1420 to 1380–1360, test after each change.
- Problem: NAT stays strict. Cause: shared VPN IP. Fix: switch to a dedicated IP VPN server or configure port forwarding.
- Problem: All devices go through VPN. Cause: missing routing marks. Fix: set up PBR: mangle marks on Mikrotik or device rules on Keenetic, and disable global VPN traffic flag.
- Problem: Voice chat disconnects randomly. Cause: peak household channel overload. Fix: enable QoS, prioritize console, limit background downloads.
- Problem: Some PSN/Xbox Live services are unreachable. Cause: DNS leaks or regional blocks. Fix: route DNS traffic from console through VPN, use reliable public resolvers, clear DNS cache (restart console).
- Problem: Router CPU overload. Cause: heavy protocol or high bitrate. Fix: switch to WireGuard or IKEv2 if hardware acceleration exists, reduce competing loads, upgrade router if possible.
Additional Features
Advanced Settings
- Alternative protocols: If WireGuard is unavailable, Mikrotik can run IKEv2/IPsec. Configure Peer, Proposal with modern ciphers, create Mode Config, set Policy. On Keenetic, install IPsec component and create an IKEv2 profile with EAP authentication. For OpenVPN, use .ovpn profiles with UDP and provider-recommended cipher.
- Selective routing by prefixes: Instead of 0.0.0.0/0 in AllowedIPs, specify subnets of game servers so only game IPs go through the tunnel. This reduces latency on non-game services. Note game server IPs can change.
- Failover/Backup: On Mikrotik, create a second VPN connection and use routes with different distances. On Keenetic, set connection priorities and device rules with fallback to main WAN.
- Monitoring: Set up Netwatch on Mikrotik to ping a remote host and switch routes if down. On Keenetic, use system monitor or periodic pings via Diagnostics.
- Port forwarding on personal server: If you own the server, use nftables/iptables to forward required UDP/TCP ports from the tunnel to your console. This improves chances for Open NAT.
Optimization
- Auto MTU tuning: Perform a ping test with "Don't Fragment" flag from your PC to an internet host, lowering packet size until fragmentation stops, then adjust MTU on the VPN tunnel accordingly.
- QoS by DSCP: Mark gaming traffic with DSCP values (e.g., CS5/EF for VoIP) and prioritize in queues. Very effective for voice chat.
- Event logs: Watch router logs. Repeated disconnect entries can signal line issues or ISP port blocking.
Tip: Keep two VPN profiles for different game regions and pre-check pings to both. Quick switching before evening raids saves time and nerves.
Tip: If you have two internet providers, use multi-WAN: one for general traffic, one dedicated to VPN gaming for extra stability.
FAQ
- Can I get NAT Type 1 on PS5 through a VPN router? Almost never. Type 1 means the console is directly on the internet without NAT. Through a VPN router, you usually get Type 2, which is fully suitable for gaming and chat.
- How do I pick the best city for my VPN server? Look at ping and stability to the datacenter hosting your game. For Europe, pick Frankfurt or Amsterdam; for the US, New York or Chicago; for Asia, Singapore. Compare 2–3 spots and pick the one with lowest stable ping.
- Will I get banned for using VPN? Rarely, if you use a personal IP and don’t break game rules. Mass shared VPN IPs sometimes get flagged by anti-cheat. Personal IP reduces this risk.
- Why is ping higher with OpenVPN than WireGuard? OpenVPN has more overhead and often runs slower on routers. WireGuard is simpler and faster, delivering lower latency.
- Should I disable VPN for streaming on my TV? Not necessarily. Better yet, use PBR to route only the console via VPN so that the TV accesses the internet directly and avoids regional restrictions or slowdowns.
- Will VPN help if my ISP has high packet loss? If loss occurs in your “last mile,” VPN won’t fix it. But if the problem is on distant routes or peers, VPN via a different path might improve things.
- Why is ping fine at night but spikes in the evening? Probably your ISP’s backbone is congested. Try switching VPN to another region in your time zone or switch to a different ISP/profile.
- Can I route multiple consoles through one VPN? Yes, just add routing rules for each console’s IP. Monitor router performance and tunnel bandwidth.
- How do I quickly undo changes? Restore your backup: on Mikrotik, use Files — Restore; on Keenetic, System — Configuration — Restore. Then reboot your router.
Conclusion
You’ve completed the full cycle: selected protocol and region, set up VPN on Mikrotik or Keenetic, enabled routing only for your console, optimized MTU/MSS, enabled UPnP, and configured priorities. Thanks to this, you have a stable connection for PS5/Xbox with predictable ping and proper NAT. If anything goes wrong, backups and straightforward troubleshooting procedures are ready: check Handshake/Connected status, routes, MTU, UPnP, and region choice.
From here, you can explore advanced routing policies, failover automation, multiple profiles for different games and timezones, and connection quality monitoring. Remember, stability and low jitter matter more than just the “lowest ping” in short tests. Practice, compare regions and protocols, save your best profiles, and your online gaming will become smooth and dependable.
Tip: Make a habit of running a quick 30-second ping test to your VPN node before evening matches. If you notice spikes, switch to a backup region—that often saves an entire evening.