Headscale : alternative self-hosted à Tailscale avec installation et cas d'utilisation
Analyse approfondie de Headscale — alternative self-hosted à Tailscale. Nous explorons son architecture, l’installation via Docker et systemd, la configuration OIDC et ACL, DERP et routages. Découvrez 7 scénarios pratiques avec résultats mesurables, astuces et comparaisons avec d’autres solutions.
Contenu de l'article
- Introduction : pourquoi choisir headscale self-hosted et quel problème il résout
- Présentation de headscale : fonctionnalités clés, architecture et atouts
- Scénario 1. homelab sans ports ouverts : accès privé au nas, caméras et services
- Scénario 2. accès équipe à staging et artefacts ci/cd multi-clouds
- Scénario 3. connexion de réseau industriel fermé (ot) via subnet router avec contrôle d’accès
- Scénario 4. hybride : relier base on-premise et kubernetes cloud sans internet public
- Scénario 5. exit node pour télétravailleurs avec politiques et navigation sécurisée
- Scénario 6. gestion d’un parc iot et caméras sur sites distants
- Scénario 7. accès temporaire pour sous-traitants et auditeurs : éphémère, tags, approbation
- Installation et configuration basique de headscale : de zéro au premier nœud
- Performance et stabilité : à quoi s’attendre et comment mesurer
- Intégrations et automatisation : comment intégrer headscale à votre stack
- Comparaison avec alternatives : forces de headscale et points d’attention
- Faq : questions pratiques fréquentes
- Conclusion : pour qui est headscale et comment démarrer rapidement
Introduction : pourquoi choisir Headscale self-hosted et quel problème il résout
Nous vivons dans un monde d’équipes réparties, d’infrastructures hybrides et d’environnements variés, allant du serveur domestique aux clusters cloud répartis géographiquement. Dans ce contexte, un VPN classique ne répond pas à toutes les attentes. Il faut un réseau privé, auto-configurable, simple à connecter, résistant aux pannes et scalable, fonctionnant au-dessus d’Internet. C’est exactement ce que proposent les solutions maillées basées sur WireGuard, avec Tailscale comme l’une des plus conviviales. Mais Tailscale est un plan de contrôle SaaS. Si vos exigences de sécurité, conformité ou coût requièrent de garder le contrôle en interne, la solution est self-hosted. Là intervient Headscale : une implémentation libre du plan de contrôle compatible avec les clients Tailscale.
Headscale répond à trois enjeux clés : vous stockez métadonnées et clés d’accès chez vous ; vous pouvez configurer ce que le SaaS limite ; vous bénéficiez d’un coût prévisible sans dépendance à un fournisseur externe. Et en prime — un réseau privé basé sur WireGuard avec chiffrement de bout en bout, traversée automatique du NAT et onboarding simple des appareils.
Présentation de Headscale : fonctionnalités clés, architecture et atouts
Qu’est-ce que Headscale. C’est un plan de contrôle self-hosted compatible avec les protocoles de gestion des clients Tailscale. Les données transitent via WireGuard, les clés sont générées localement sur les appareils, les messages de contrôle passent par votre instance Headscale. Vous gérez utilisateurs, politiques ACL, routes, MagicDNS et, si besoin, vos propres relais DERP. Headscale est écrit en Go, installé typiquement en binaire unique ou conteneur avec une base de données.
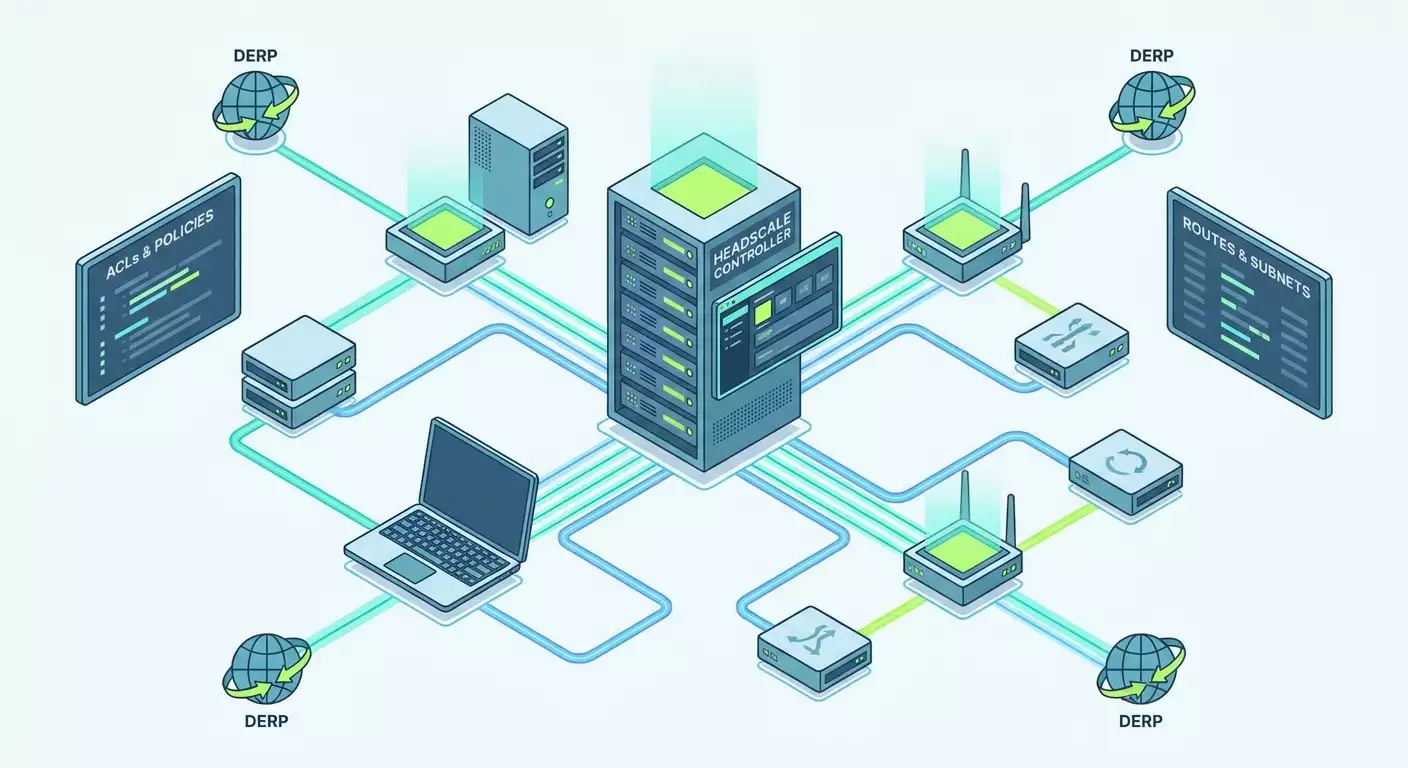
Architecture. Trois couches : 1) clients tailscaled sur les nœuds (Linux, Windows, macOS, FreeBSD, containers, VM), 2) votre Headscale (plan de contrôle) avec stockage (SQLite ou base de données relationnelle), 3) serveurs DERP pour relayer le trafic en cas de NAT complexe. Par défaut, les clients établissent des peers WireGuard directs, sinon utilisent DERP. Le plan de contrôle ne transporte pas le trafic utilisateur, il distribue coordonnées et clés peers.
Fonctionnalités (à jour pour les déploiements de 2026) :
- Compatibilité avec les clients Tailscale actuels sur plateformes desktop et serveurs.
- Utilisateurs et groupes, tags pour nœuds de service, clés préconfigurées (preauth keys), clés éphémères pour sous-traitants.
- Politiques ACL avec modèle d’autorisation explicite, règles par utilisateurs, groupes, tags, ports et protocoles. Support de politiques basées sur tags pour nœuds headless.
- Routage de sous-réseaux (subnet routers), annonce de réseaux externes, exit nodes pour router tout le trafic internet via un nœud de confiance.
- MagicDNS pour des noms stables des nœuds et services au sein du réseau privé.
- Authentification OIDC avec SSO d’entreprise, vérification des utilisateurs et création automatique de comptes.
- Intégration DERP : usage des relais publics ou déploiement de vos propres relais pour minimiser latence et dépendance.
- Métriques Prometheus et journalisation pour audit et observabilité.
Avantages. Surtout le contrôle et l’isolation. Vous pilotez le cycle de vie des clés et politiques, gardez les métadonnées en interne, et les coûts n’augmentent pas linéairement avec le nombre de nœuds (notamment à l’échelle de centaines ou milliers). La performance de WireGuard est élevée : sur x86-64 moderne, des centaines de Mbit/s sont aisés, avec une latence proche des routes Internet. Headscale s’intègre bien avec les outils DevOps et IaC, permet un onboarding rapide des sites et la migration cloud fluide sans couture.
Scénario 1. Homelab sans ports ouverts : accès privé au NAS, caméras et services
Pour qui et pourquoi
Pour ingénieurs, DevOps et passionnés ayant un cluster domestique : NAS, mini-PC avec containers, serveurs médias, domotique. Objectif : accès depuis le travail ou en déplacement sans ouvrir de ports ni IP publique, avec chiffrement et noms d’hôtes conviviaux.
Fonctionnement
Vous déployez Headscale sur un VPS ou mini-serveur chez vous et enregistrez vos appareils via des preauth keys. Chaque nœud lance tailscaled, qui crée un tunnel WireGuard vers un peer aux adresses privées. MagicDNS garantit des noms stables, ACL restreint les accès non nécessaires.
Guide pas à pas
- Préparez un serveur accessible publiquement en TCP/UDP avec horloge synchronisée NTP. Installez Headscale en container ou via package. Démarrez avec SQLite, migrer ensuite vers une BDD relationnelle si besoin.
- Activez la terminaison TLS par reverse proxy. Pour un usage domestique, la méthode la plus simple est l’obtention automatique de certificat. Proxy au Headscale en local sur IP et port internes.
- Créez le premier utilisateur Headscale (admin de votre « domaine »). Générez une preauth key réutilisable ou unique par appareil.
- Installez client Tailscale sur vos nœuds. Lancez tailscaled, connectez le nœud en précisant le serveur login et preauth key. Pour serveurs headless, utilisez tags comme tag:home-lab.
- Activez MagicDNS et vérifiez la résolution des noms. Créez une ACL simple : accès de votre ordinateur portable vers le NAS et serveur média, mais pas l’inverse.
- Si nécessaire, déployez un relais DERP local près de chez vous pour les appareils derrière un NAT symétrique ne pouvant établir de peers directs.
Exemple et résultats
Cas pratique : mini-PC N100 avec Docker, NAS et Home Assistant. Avant Headscale, l’accès externe passait par port forwarding et DDNS. Après : connexion au serveur média et runners Git via laptop mobile sans ports ouverts. Latence entre laptop mobile et nœud domestique réduite de 65–80 ms à 40–55 ms grâce au WireGuard direct. Débit SMB privé multiplié de 12–20 à 80–140 Mbit/s selon réseau mobile et routeur.
Astuces et bonnes pratiques
- Attribuez des noms statiques aux hôtes et services via MagicDNS, utilisez des alias courts.
- Activez la journalisation dans Headscale et exportez des métriques Prometheus pour la visibilité.
- Pour des SoC à faible consommation, réduisez le MTU de l’interface WireGuard pour limiter la fragmentation.
- Pour un nœud relay souvent sollicité, consacrez-lui un canal dédié ou installez un DERP local pour alléger la charge.
Scénario 2. Accès équipe à staging et artefacts CI/CD multi-clouds
Pour qui et pourquoi
Pour équipes produit et plateformes avec staging réparti sur plusieurs fournisseurs et régions, où des runners Git construisent des containers dans un cloud et poussent les images dans un autre. Objectif : éviter les clés SSH individuelles, simplifier l’accès aux services et cacher l’infra d’Internet public.
Fonctionnement
Headscale est déployé dans une sous-réseau distinct, enregistrement des clusters build, staging et laptops dev. Trafic inter-services sur adresses privées respectant ACL. Tags sur runners et nœuds services pour éviter explosion des clés utilisateurs. Secrets registre container restent en réseau privé.
Guide pas à pas
- Déployez Headscale et configurez OIDC avec votre fournisseur SSO d’entreprise. Cela crée automatiquement les utilisateurs et révoque l’accès lors des départs.
- Créez groupes (ex : devs, qa) et tags pour services (tag:runner, tag:staging). Appliquez politique par défaut interdite.
- Enregistrez les runners Git et VM staging avec tags. Fournissez clés préconfigurées ou accès SSO aux utilisateurs.
- Définissez ACL : développeurs vers staging sur ports nécessaires, runners vers registre, cache artefacts vers runners et staging; accès Internet public non nécessaire.
- Ajoutez un subnet router dans le réseau hébergeant des services bare-metal pour que staging y accède sans ouvrir le périmètre.
Exemple et résultats
Entreprise avec 45 devs et 12 runners sur deux régions. Avant Headscale, bastions SSH multiples, groupes de sécurité ouverts et incidents liés à clés oubliées. Après transition : 10 minutes pour onboard dev (SSO + politique), délai accès staging réduit d’heures à minutes, réductions ports ouverts extérieur de 38 à 6. Trafic egress inter-régions réduit de 28% grâce aux tunnels peers directs.
Astuces et bonnes pratiques
- Utilisez clés éphémères pour sous-traitants temporaires : validité 8–24h, renouvellement sur ticket.
- Attribuez uniquement des tags aux nœuds headless pour faciliter rotation et audit sans dépendance aux liens utilisateurs.
- En CI, stockez les adresses serveur artefacts et registre en noms MagicDNS pour résilience face aux migrations IP.
Scénario 3. Connexion de réseau industriel fermé (OT) via subnet router avec contrôle d’accès
Pour qui et pourquoi
Pour intégrateurs et ingénieurs des systèmes industriels (PLCs, HMI, équipements réseau) dépourvus de moyens modernes d’accès à distance. But : offrir un accès limité aux diagnostics et mises à jour, tout en gardant le réseau isolé d’Internet.
Fonctionnement
Un des gateways du réseau OT héberge tailscaled avec annonce des routes subnet. Ingénieurs se connectent à Headscale, accès limité seulement aux ports nécessaires (Modbus/TCP, HTTPS admin) ; le reste est bloqué par ACL. Accès unidirectionnel possible, pas de connexion entrante vers laptops ingénieurs.
Guide pas à pas
- Déployez un nœud gateway en limite OT, idéalement double interface : réseau technologique et réseau IT/Internet habituel.
- Installez client Tailscale et enregistrez avec tag tag:ot-gateway dans Headscale. Activez annonce de route (ex : 10.10.0.0/16).
- Activez la route dans Headscale. Créez ACL « ingénieurs -> tag:ot-gateway -> 10.10.0.0/16 tcp:443,502 » (exemple ports). Bloquez l’accès inverse.
- Activez journalisation et audit via SIEM, collectez métriques.
Exemple et résultats
Projet monitoring sur site isolé : 3 gateways, 17 PLCs, 4 panneaux HMI. Anciennement L2VPN via liens coûteux. Après migration Headscale avec subnet router, coûts réduits de 42%, MTTR de 2h à 25 min grâce à accès distant standardisé. Inspection des paquets côté gateway, tunnels chiffrés de bout en bout.
Astuces et bonnes pratiques
- Fixez précisément les ports, bloquez RDP/SSH dans OT, ne laissez que le nécessaire aux ingénieurs.
- Activez journaux d’activité conservés au minimum 90 jours.
- Pour sites sensibles, déployez DERP localement pour éviter les sorties hors pays/région.
Scénario 4. Hybride : relier base on-premise et Kubernetes cloud sans Internet public
Pour qui et pourquoi
Pour équipes déplaçant certains services vers Kubernetes tout en gardant bases et queues de messages on-premise. Objectif : simplifier la connectivité réseau sans IPsec ni routage complexe, faciliter rollback et migration multi-cloud.
Fonctionnement
Chaque nœud de cluster (ou gateway pod dédié) reçoit tailscaled. La base est annoncée via subnet router ou nœud intégré au réseau DB. Applications Kubernetes accèdent à la DB via nom MagicDNS. ACL limite accès aux namespaces et ports nécessaires (5432, 27017, etc.).
Guide pas à pas
- Créez une image sidecar ou DaemonSet avec tailscaled sur chaque nœud/pod nécessitant accès sortant privé. Alternativement, tailscaled au niveau worker node.
- Enregistrez nœuds dans Headscale avec tag tag:k8s. Pour DB, un nœud avec tag tag:db.
- Configurez ACL : tag:k8s → tag:db tcp:5432 et autres ports nécessaires ; interdit aux autres nœuds.
- Attribuez un nom MagicDNS à la base, utilisez-le dans variables d’environnement des manifests.
- Pour haute disponibilité, activez deux relais DERP dans des régions distinctes et testez basculement.
Exemple et résultats
Startup fintech : Kubernetes sur deux régions, base on-prem avec support avancé. Auparavant IPsec complexe entre routeurs avec chutes régulières lors rotations clés. Avec Headscale : déploiement en 15 min, non-impact du failover régional, latence lecture DB 6–8 ms, écriture 8–12 ms, SLA > 99,95% sans intervention manuelle.
Astuces et bonnes pratiques
- Planifiez MTU : Kubernetes CNI + WireGuard ajoutent overhead ; testez valeurs optimales.
- Isoler tailscaled dans un cgroup à faible priorité pour éviter compétition CPU avec charge principale.
- Pour requêtes inter-régions, utilisez read-replicas pour exécuter localement opérations sensibles à la latence.
Scénario 5. Exit node pour télétravailleurs avec politiques et navigation sécurisée
Pour qui et pourquoi
Pour entreprises avec employés en mobilité sur réseaux potentiellement à risque. Objectif : sécuriser sortie Internet via nœud corporate avec filtrage et surveillance, sans exposer services internes.
Fonctionnement
Serveur dédié configuré en exit node, avec forwarding et NAT activés. ACL et politiques contrôlent qui peut utiliser exit node. Logs et filtrage restent côté entreprise.
Guide pas à pas
- Déployez serveur solide avec bon débit et CPU. Activez forwarding IPv4/IPv6 et NAT dans firewall.
- Enregistrez nœud avec tag tag:exit dans Headscale, activez mode exit node sur client.
- Dans ACL, autorisez groupe travelers à utiliser exit, interdisez aux autres.
- Connectez filtrage DNS et web sur serveur exit, activez métriques.
Exemple et résultats
Équipe outsourcing de 20 experts souvent en déplacement. Avant, Wi-Fi publics risqués. Après exit node : tout trafic passe par nœud corporate, politique unique appliquée, incidents journalisés. Latence supplémentaire moyenne 15–25 ms comparé sortie directe en réseaux régionaux.
Astuces et bonnes pratiques
- Planifiez deux exit nodes : lointain et proche. Choisissez le plus proche géographiquement pour réduire la latence.
- Activez DNS de bout en bout via MagicDNS, centralisez les politiques de blocage des domaines malveillants.
- Ne combinez pas un même nœud comme exit et service business critique : séparez les rôles pour fiabilité.
Scénario 6. Gestion d’un parc IoT et caméras sur sites distants
Pour qui et pourquoi
Pour intégrateurs systèmes et entreprises avec nombreux dispositifs périphériques (caméras, capteurs, gateways). Objectif : accès pour diag et mises à jour sans ouverture de ports ou astuces SIM-APN, avec traçabilité et audit précis.
Fonctionnement
Chaque porte d’accès au site équipe un gateway économique avec tailscaled. Il annonce subnets avec dispositifs ou fait office de proxy. Serveurs de gestion et ingénieurs au siège se connectent via Headscale. ACL régule communications : ingénieur -> gateway -> dispositifs. Clés éphémères activables fenêtre de maintenance.
Guide pas à pas
- Standardisez l’image gateway : tailscaled + agents système, firewall basique et monitoring. Bloquez SSH externe.
- Déployez Headscale, créez tags tag:edge-gw et groupes d’ingénieurs.
- Ajoutez routes vers sous-réseaux locaux dispositifs, activez via console Headscale.
- Définissez ACL : ingénieurs -> tag:edge-gw -> dispositifs aux ports de contrôle et streaming nécessaires.
- Mettez en place collecte métriques, journaux d’accès et alertes sur nouveaux nœuds.
Exemple et résultats
Retailer avec 120 magasins, 8–12 caméras chacun. Avant : tunnels sur routeurs grand public, instables et difficiles à maintenir. Après migration : connectivité stable 98,7% du temps, latence moyenne vers siège 18–32 ms, déploiement nouveau magasin en moins de 30 minutes avec image gateway prête. Fin des connexions sortantes inattendues, accès initié par ingénieurs via adresses privées.
Astuces et bonnes pratiques
- Sur gateways, activez watchdog et redémarrage automatique de tailscaled en cas de panne réseau.
- Générez preauth keys par lots pour installation logistique ; validité 48–72h facilite distribution et mise en place.
- Pour streams vidéo importants, déployez DERP locaux dans régions clés afin que tunnel ne recherche pas des relais distants.
Scénario 7. Accès temporaire pour sous-traitants et auditeurs : éphémère, tags, approbation
Pour qui et pourquoi
Pour équipes ayant régulièrement des intervenants externes pour durée limitée. Objectif : fournir un accès strictement nécessaire, révoqué automatiquement sans nettoyage manuel des clés à la fin.
Fonctionnement
Vous créez une preauth key éphémère ou limitez la durée d’une clé normale, attribuez un tag et ACL restreint aux services ciblés. À expiration, le nœud disparaît sans traces. Optionnellement, la validation manuelle est requise avant activation des routes.
Guide pas à pas
- Créez un groupe contractors et tags tag:readonly, tag:reveng.
- Générez preauth key expirant sous 24–72h, non réutilisable.
- Définissez ACL restreints aux services nécessaires, ex : interface web staging et dépôt artefacts.
- Suivez apparition nœuds dans les logs, activez approbation manuelle si besoin.
Exemple et résultats
Audit sécurité de 10 jours. Sous-traitant a accès à staging et logs. À expiration, nœuds supprimés automatiquement. Reprise d’accès en 15 minutes au réaudit. Aucun incident lié à clés oubliées.
Astuces et bonnes pratiques
- Identifiez clairement ces nœuds par tags et préfixe dans le nom pour faciliter leur repérage.
- Ne donnez pas de droits exit node aux sous-traitants si inutile pour la tâche.
- Configurez notifications avant expiration des clés afin d’éviter des coupures inattendues.
Installation et configuration basique de Headscale : de zéro au premier nœud
Préparation de l’environnement
- Serveur Linux accessible publiquement en TCP/UDP. Horloge synchronisée via NTP.
- Nom de domaine dédié pour la facilité. Terminaison TLS via reverse proxy.
- Connexions sortantes ouvertes pour clients (UDP nécessaire au NAT traversal).
Déploiement
- Installation Headscale en container. Créez un fichier compose avec headscale et, si besoin, base de données. Exposez le port interne Headscale vers localhost, laissez TLS au reverse proxy. Déclarez variables pour domaine, MagicDNS, fournisseur SSO éventuel.
- Démarrez Headscale, assurez-vous que le service répond et génère des logs. Vérifiez métriques Prometheus si activées.
- Créez l’utilisateur initial (ex : admin). Générez une preauth key. Configurez OIDC : adresse provider, ID application, secret, liaison domaine mail avec groupes.
- Optionnel : déployez DERP relay sur la même infra. Enregistrez ses coordonnées dans configuration Headscale. Testez accessibilité depuis deux réseaux différents.
Connexion du premier nœud
- Installez client Tailscale sur serveur ou laptop. Lancez le service système.
- Connectez le nœud à votre plan de contrôle en fournissant l’adresse du login server et preauth key. Ajoutez flags tags ou annonce de route selon besoin.
- Vérifiez statut, liste des peers et résolution par MagicDNS. Testez la connectivité entre au moins deux nœuds.
ACL et routages
- Créez une politique minimale : par défaut interdit, avec autorisations spécifiques par groupes et tags.
- Si accès à un subnet nécessaire, activez l’annonce de route sur le nœud adéquat et autorisez dans Headscale. Vérifiez forwarding et règles firewall.
- Pour exit node, activez forwarding et NAT systèmes. Restreignez accès exit par groupes.
Erreurs fréquentes et comment les éviter
- Absence de NTP : une désynchronisation de plus de quelques minutes perturbe handshake WireGuard. Surveillez la synchronisation.
- Blocage UDP : si firewall ou fournisseur coupe UDP, le peer passera obligatoirement par DERP. Assurez-vous du passage UDP, déployez DERP proche clients.
- Mauvais MTU : provoque fragmentation, perte TCP. Debuggez MTU par tracert et réduisez-le de 40–80 octets si nécessaire.
- ACL trop larges : appliquez le principe du moindre privilège. Limitez ports et axes de communication.
- Clés preauth longues et réutilisables : préférez durée limitée et usage unique, surtout pour utilisateurs externes.
Performance et stabilité : à quoi s’attendre et comment mesurer
Débit. Sur CPU x86 moderne avec accélération crypto, 600–900 Mbit/s entre datacenters via peers directs est courant. Sur SoC basse consommation (N100, N5105), 300–600 Mbit/s avec MTU bien configuré. ARM milieu de gamme atteint 100–300 Mbit/s. DERP réduit le débit selon charge relais et localisation.
Latence. En peer direct, latence proche de celle d’un trajet Internet : 2–10 ms intra-région, 20–40 ms inter-région. Par DERP, ajoutez 10–40 ms vers relais. Un DERP local réduit de 25–60% ce « surcoût » versus relais distants.
Fiabilité. Dans la plupart des réseaux, 90–95% des peers établissent connexion directe, le reste passe par DERP. En présence de NAT symétrique ou CGNAT, prévoyez relais. Monitorer métriques (ratio peers direct/DERP, échecs handshake, jitter) pour intervenir rapidement.
Intégrations et automatisation : comment intégrer Headscale à votre stack
- Reverse proxy : utilisez Caddy ou Traefik pour TLS automatique et routing simple. Exposez Headscale sur port interne, juste le proxy en externe.
- Infrastructure as Code : stockez config Headscale (utilisateurs, ACL, tags) dans Git. Appliquez via pipeline, validez PR avant déploiement.
- Ansible : rôles d’installation tailscaled sur nœuds, gestion des preauth keys, activation routes. Utile pour onboarding massif.
- Monitoring : collectez metrics Headscale avec Prometheus, affichez dans Grafana. Alerte sur nombre peers DERP, échecs SSO, erreurs routes.
- Journaux : centralisez dans Elastic stack ou alternatives, conservez et interrogez événements connexion/déconnexion nœuds et erreurs.
Comparaison avec alternatives : forces de Headscale et points d’attention
Headscale vs Tailscale (SaaS)
- Contrôle et stockage des données : Headscale conserve métadonnées localement, facilite conformité aux exigences internes. Tailscale cloud externalise certaines gestions.
- Flexibilité : DERP propres, intégrations et configurations spécifiques selon politique interne.
- Coût : Headscale plus prévisible à grande échelle, vous payez l’infra, pas la licence par nœud.
- Support fonctionnel : fonctionalités « basiques » largement couvertes, mais quelques avancées cloud peuvent manquer ou différer. Vérifiez liste au moment de planifier migration.
Headscale vs ZeroTier
- Tous deux maillages. Headscale repose sur WireGuard et est compatible clients Tailscale, ZeroTier utilise son propre stack.
- Headscale offre un modèle OS plus simple et intégration étroite dans réseaux Linux. ZeroTier avantageux pour hybrides L2/L3 et switches virtuels.
- Performances : WireGuard souvent plus rapide grâce à accélération CPU matériel.
Headscale vs Netmaker/Netbird
- Netmaker et Netbird aussi orchestrateurs WireGuard avec interfaces riches. Headscale brille par compatibilité clients Tailscale et modèle ACL mature, bien que UI puisse nécessiter outils tiers.
- Si vous êtes déjà dans l’écosystème clients Tailscale et souhaitez self-hosted, Headscale est généralement le choix naturel.
Headscale vs « VPN classique » (OpenVPN/IKEv2)
- Maillage avec traversée NAT plus simple à onboarder et plus résilient aux réseaux capricieux. MagicDNS et tags gèrent finement les accès.
- VPN classique utile dans d’autres cas : sortie Internet statique, contournement de blocages, passerelle unique avec IP fixe spécifique.
Remarque experte sur usage VPN classique
vpn.how propose des serveurs VPN personnels avec une adresse IP dédiée. Les emplacements, protocoles et tarifs disponibles figurent sur le site et dans votre compte. Les moyens de paiement et le montant final sont affichés lors du paiement. Choisir un serveur
FAQ : questions pratiques fréquentes
1. Peut-on utiliser les clients mobiles ?
Sur desktop et serveurs, sans souci. Les clients officiels mobiles changent régulièrement leur support des serveurs login personnalisés. En production, on favorise notebooks et gateways, et pour mobile des proxys locaux ou profils VPN classiques dédiés. Vérifiez compatibilité avant déploiement à grande échelle.
2. Comment assurer haute disponibilité de Headscale ?
Placez Headscale derrière reverse proxy avec health checks, stockez état dans base haute dispo, déployez un second instance dans une autre zone/région. Maintenez DERP dans au moins deux régions. Sauvegarde de config et base est indispensable.
3. Quelle performance pour beaucoup de nœuds ?
Centaines de nœuds courants, milliers possibles avec architecture et monitoring appropriés. Surveillez latence handshake, proportion DERP, charge BDD et TLS, séparez rôles : plan de contrôle et DERP.
4. Un IP public est-il nécessaire pour chaque nœud ?
Non. Grâce au NAT traversal, les clients établissent des routes directes. Le seul requis en IP publique sont Headscale et relais DERP, accessibles de l’extérieur.
5. Peut-on segmenter en plusieurs « organisations » ?
Oui via utilisateurs, groupes et tags. Utilisez ACL séparées pour équipes indépendantes. Pour isolation forte, déployez plusieurs instances Headscale.
6. Comment migrer de Tailscale SaaS vers Headscale ?
Créez Headscale, reproduisez ACL et groupes, générez preauth keys, reconfigurez nœuds vers nouveau login server par étape. Utilisez des réseaux parallèles durant migration, commencez par nœuds non production.
7. Taildrop et fonctions similaires fonctionnent-elles ?
Le transfert de fichiers via réseau privé est possible mais le comportement des fonctions propriétaires peut différer du cloud. Testez avec votre version clients et Headscale.
8. Comment éviter les fuites de trafic hors tunnel ?
Utilisez exit node avec routage obligatoire de tout le trafic pour groupes sensibles. Activez politiques DNS. Sur clients, désactivez split-tunnel si nécessaire.
9. Que journalise Headscale ? Correspond-il aux exigences privacy ?
Journalisation des événements de gestion : authentification, enregistrement nœuds, changements politiques. Le trafic utilisateur ne transite pas par le plan de contrôle. Suivez vos politiques internes de conservation et minimisation des données.
10. Que faire si le fournisseur bloque UDP ?
Attendez une hausse des peers DERP. Déployez DERP proche des nœuds, envisagez fallback via tunnels TCP sur sites problématiques. Diagnostiquez la politique fournisseur en amont.
Conclusion : pour qui est Headscale et comment démarrer rapidement
Si vous souhaitez garder le contrôle, respecter des politiques internes et maîtriser vos coûts, Headscale est la solution. Il est particulièrement adapté à : 1) homelab et PME nécessitant accès facile sans ouvrir de ports ; 2) équipes produit avec staging et CI/CD multi-cloud ; 3) projets hybrides gardant bases on-prem ; 4) cas industriels avec réseaux isolés ; 5) parcs edge/IoT ; 6) accès temporaire sous-traitants. Ses points forts : onboarding simple, ACL flexibles, MagicDNS, routages et DERP personnalisés. Recommandation de déploiement : 1) mettre Headscale derrière reverse proxy ; 2) activer OIDC pour onboarding ; 3) enregistrer les 3–5 premiers nœuds ; 4) définir ACL minimale au moindre privilège ; 5) activer métriques et journaux ; 6) tester vos scénarios clés ; 7) scaler en ajoutant tags et subnet routers. Pour la sortie Internet avec IP perso et confidentialité sur réseaux publics, le VPN personnel reste une solution dédiée, souvent avec un serveur sur vpn.how : IP dédiée, multi-protocoles, sélection géographique, démarrage rapide, tarification claire. Pour le réseau interne, DevOps et hybride, Headscale est la meilleure option. Vous disposez ainsi d’un réseau privé sécurisé et performant sous WireGuard, où contrôle et données restent chez vous, avec une connexion des nouveaux nœuds en quelques minutes. Une rare combinaison où sécurité, praticité et souplesse se rejoignent parfaitement.
Éditeur : vpn.how